Have you ever looked up at the sky and watched a plane glide by, feeling a little spark of wonder? That feeling, that sense of something amazing taking to the air, is exactly what we are going to capture today. Getting started with putting an aircraft on paper is simpler than you might think, and it can be a truly enjoyable way to spend some time. We are going to walk through the basic ways to make your very own flying machine appear right before your eyes, a process that is, quite honestly, a bit like magic.
This little guide is all about helping you create something cool, something that shows off the spirit of flight. It doesn't matter if you have never picked up a pencil to draw anything before, or if you are someone who draws all the time. This approach is set up so anyone can follow along, and that is what makes it so special. We are focusing on making the process easy and fun, so you can enjoy every moment of bringing your winged creation to life.
So, get ready to explore the world of drawing with us. We will go step by step, showing you how to put down those first lines and then add all the little bits that make your airplane look like it is ready to take off. It's a chance to let your imagination take flight, to see what amazing things you can create with just a few simple shapes and a little bit of guidance. This is, you know, a pretty cool way to learn something new and make something you can be proud of.
Table of Contents
- How Can I Start Drawing an Airplane Today?
- What Are the First Shapes for Drawing an Airplane?
- Getting the Right View for Drawing an Airplane
- Adding the Details to Your Airplane Drawing
- Are There Different Kinds of Airplanes to Draw?
- How to Keep Improving Your Airplane Drawing Skills
- Exploring Other Things to Draw After Your Airplane
- Final Summary
How Can I Start Drawing an Airplane Today?
Starting to draw an airplane is, you know, really quite simple, and it begins with just deciding you want to give it a go. There are many ways to approach making a picture of a plane that looks like it is flying through fluffy white clouds. The key is to find a way that feels comfortable and not at all difficult. This whole idea is about having a good time and seeing what you can create with a pencil and a piece of paper. It is a very accessible sort of activity for anyone who enjoys putting thoughts down on paper.
This particular set of instructions is made for anyone who loves to draw, or who dreams of things that fly high above. It is a very friendly sort of introduction to making aircraft pictures. We will walk you through each step, making sure that you feel supported and ready to try each part. The aim is to help you get comfortable with the process, so you can enjoy seeing your drawing take shape. It is, basically, about having fun with your art.
Learning how to draw an airplane is, in some respects, a truly wonderful subject for younger artists, or even those just starting out. It helps with getting your hand to do what your mind imagines, and it builds a little bit of confidence with each line you put down. There are several straightforward approaches for making an airplane picture, making sure that even if you have never drawn before, you will find a way that works for you. You can, for instance, follow along with the guidance and create your very own flying machine, and it is pretty easy for people of all ages to pick up.
This process is just right for people who are new to drawing, for younger folks, and for anyone who just enjoys the act of creating something. You just need to follow the steps, and you will be able to bring these wonderful flying objects to life on your paper. It is, quite literally, a step-by-step approach to drawing an airplane. This kind of instruction is very helpful for kids, for those just getting started, and for younger children too. It is, actually, a fairly basic airplane drawing instruction set for both younger and older people to use.
What Are the First Shapes for Drawing an Airplane?
When you first begin drawing an airplane, it's often helpful to think about the most basic forms that make up its body. So, to start, you might consider taking some initial measurements of how tall and how wide the airplane you want to draw will be. This helps you get a good sense of proportion right from the beginning. You could, for example, make a light outline to mark out where the plane will sit on your paper. This simple step helps you make sure your aircraft fits nicely on the page and looks balanced.
A good way to kick things off is by drawing a line that goes up at an angle, almost like a gentle slope. Then, you can add another line that crosses it, making a sort of corner. This simple method helps you get the general shape of the plane's main body, which is, in a way, the backbone of your drawing. It's about breaking down something that looks complex into very easy-to-manage parts. You are, you know, essentially creating a framework to build upon.
After those first lines, you can then start to shape the main part of the plane. For instance, to draw a plane, you could begin by drawing a curve that goes up, sort of like a gentle arc, that has a little hook shape at one end. Then, you would draw another curve that goes down on top of it, which helps to close the shape and form the main body of the plane. This really helps to get the overall form established before you add any of the smaller bits. It is, basically, about creating the main structure of your flying object with simple, flowing lines.
Discovering how to use these basic shapes, understanding how different parts relate to each other in terms of size, and then adding smaller details are all part of bringing your aircraft pictures to life. You can, in fact, learn to make a simple airplane drawing using these straightforward steps and methods. It is a very easy art instruction for both younger people and older people, you only need to follow along with the steps. If you need a little more help, that is completely fine too, as there are always ways to get more guidance.
Getting the Right View for Drawing an Airplane
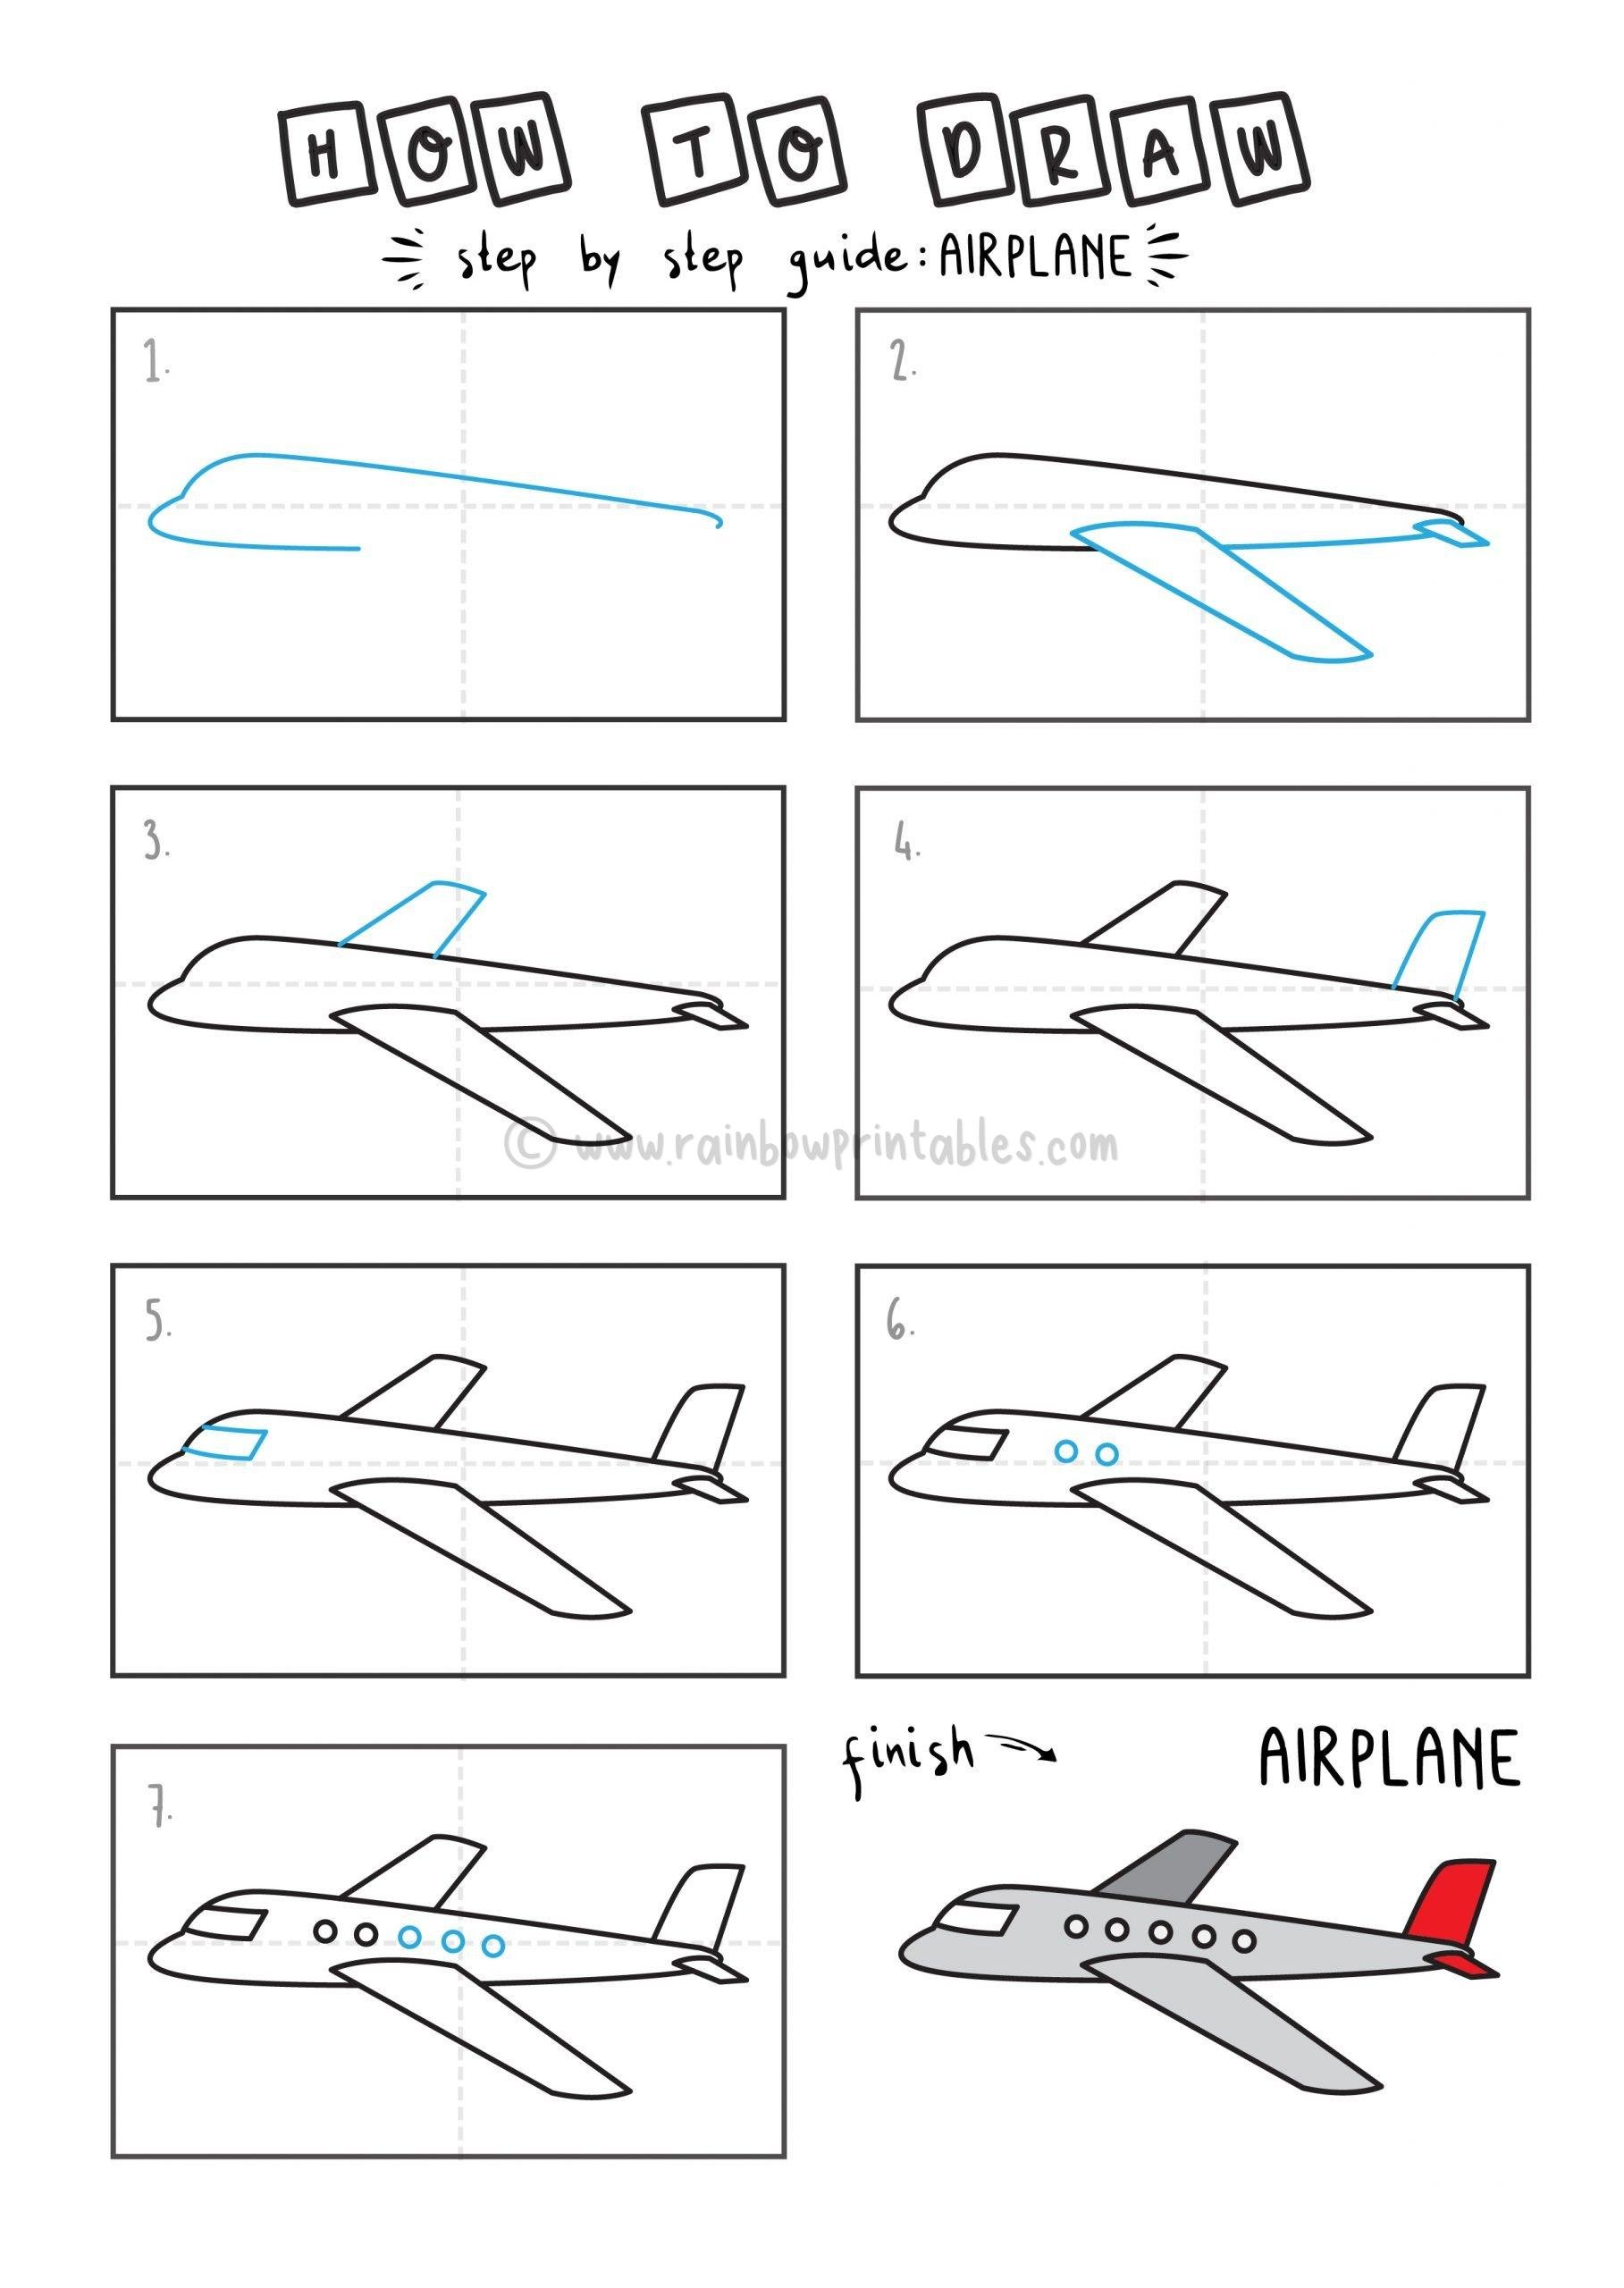
Choosing the right angle for your airplane picture can make a big difference in how it looks. This particular instruction set shows you how to draw an airplane from a three-quarters view. This means you are looking at the plane a little from the side and a little from the front, which often gives it a very dynamic and realistic feel. It is, basically, a great way to show off more of the plane's features at once, making it seem like it is really moving through the air.
This approach includes clear drawing instructions along with step-by-step pictures that show you exactly what to do. There are, for instance, nine steps in total, which means you get a clear path from beginning to end. The airplane used as an example in this guide is a simple passenger jet, the kind you might see at an airport. This type of plane is, in a way, pretty easy to draw, making it a good choice for anyone who is just getting started with aircraft pictures. It is, you know, a very common and recognizable shape.
Drawing a plane step by step is, in some respects, a very approachable task for children and those new to drawing. The way this guide is set up, it makes the process feel very manageable and not at all overwhelming. You are guided through each part, building up the picture piece by piece. This methodical way of working means you can focus on one small thing at a time, which really helps to keep things simple and fun. It is, actually, a very satisfying way to create something.
The goal here is to make sure you feel comfortable and confident as you work on your drawing. By showing you a specific view and breaking it down into small, manageable actions, you can focus on getting each part just right. This kind of detailed but simple instruction is very helpful for building skills. You will, for instance, be able to see how each line contributes to the overall shape, making the process very clear and easy to follow. It is, pretty much, about taking it one small bit at a time.
Adding the Details to Your Airplane Drawing
Once you have the main outline of your airplane in place, it is time to think about adding the smaller parts that make it truly come alive. These are the things that give your plane its own unique look, like the windows, the doors, and the engines. You can, for instance, start by thinking about where these elements would naturally fit on the body of the plane. It is, in a way, like dressing up your basic shape with all the necessary accessories.
For a passenger jet, you might add a row of small windows along the side of the fuselage, which is the main body of the plane. Then, you could put in the outline of the wings, making sure they look like they are ready to hold the plane up in the air. After that, you could add the tail section, which helps the plane steer and stay stable. These little additions are, actually, what transform a basic shape into a recognizable aircraft.
You can also think about the engines, which are usually located under the wings on a passenger jet. Drawing these can be as simple as adding a couple of oval shapes. Then, you might consider the landing gear, those wheels that help the plane move on the ground. Even if your plane is meant to be flying, adding a hint of where these parts would be can give your drawing more depth. It is, you know, about adding those subtle touches that make a big difference.
Remember, the aim here is to make the drawing process enjoyable and not at all complicated. You do not need to worry about making every single detail perfect. The goal is to capture the essence of an airplane. So, if a detail seems a little tricky, you can simplify it or even leave it out for now. The most important thing is to keep drawing and have a good time with it. This is, in fact, how you get better at anything, by just keeping at it and enjoying the creative process.
Are There Different Kinds of Airplanes to Draw?
Absolutely, there are many different kinds of airplanes you can try to draw, and each one has its own special look. Once you get the hang of drawing a simple passenger jet, you might want to explore other types of aircraft. You could, for instance, try your hand at an airliner, which is a big plane that carries many people. These often have long bodies and large wings, making them a little different from the smaller planes.
Then, there are fighter jets, which are designed for speed and agility. These planes typically have a very sleek and pointed shape, with swept-back wings. Drawing a fighter jet can be a fun challenge because of their distinct lines and aggressive appearance. It is, basically, about capturing that sense of quick movement and power on paper. You will find that their shapes are quite different from the passenger planes, which makes them very interesting to sketch.
You might also be interested in drawing vintage airplanes, those older planes from a long time ago. These often have propellers and a more classic, rounded look. Some vintage planes might even have two sets of wings, one above the other, which gives them a very charming and unique appearance. Drawing these older models can be a wonderful way to connect with the history of flight. It is, you know, a bit like stepping back in time with your pencil.
Exploring these different types of aircraft can really help you expand your drawing abilities. Each kind of plane presents new shapes and forms to consider, which keeps your creative practice fresh and interesting. You can learn to draw aircraft with ease, no matter what kind you choose. It is, in some respects, about seeing how various designs come together and then putting that understanding onto your paper. This variety helps you keep your drawing skills growing and your imagination active.
How to Keep Improving Your Airplane Drawing Skills
Getting better at drawing airplanes, or anything really, comes from simply doing it often and trying new things. Once you have drawn a few planes, you might start to notice little ways you can make your next drawing even better. You could, for example, pay more attention to how light falls on the plane, or how the shadows might appear. These small observations can really add depth to your pictures.
One way to keep improving is to look at actual pictures of airplanes. See how the wings attach to the body, or how the tail looks from different angles. This kind of observation helps you understand the real-world shapes and how they fit together. It is, basically, like doing a little bit of research for your art. The more you look, the more you will see, and the more you will be able to put into your drawings.
You can also try drawing the same airplane multiple times, but each time trying to focus on a different aspect. Maybe one time you focus only on getting the body shape just right, and the next time you concentrate on the engines or the windows. This focused practice can help you refine specific parts of your drawing. It is, you know, a very effective way to build skill in a particular area.
Another helpful tip is to not be afraid to make mistakes. Every line you draw, even if it is not exactly what you intended, teaches you something. It is part of the learning process. So, just keep drawing, keep experimenting, and keep having fun with it. That is, in fact, the most important part of getting better at any creative pursuit. The more you enjoy it, the more you will want to do it, and that is how true progress happens.
Exploring Other Things to Draw After Your Airplane
Once you have successfully drawn an airplane, you might find yourself wondering what else you could create. The skills you have picked up, like understanding basic shapes and how to put them together, are very useful for drawing many other things. You could, for instance, try drawing other vehicles that move, like cars, trains, or even boats. These all have their own unique forms, but the process of breaking them down into simpler shapes is very similar.
Drawing an airbus, which is a type of large passenger plane, is a very easy task once you understand the basic principles. And, as a matter of fact, the techniques you use for drawing airplanes can be applied to other flying objects too. We have, for example, seen many ways to draw rockets and spacecraft. You could explore these kinds of pictures as well, as they also involve similar ideas about curves, lines, and putting parts together to make a whole.
You could also branch out into drawing animals or people. While these are different from machines, the idea of looking for basic shapes within them, like circles for heads or cylinders for limbs, is a very common approach in art. This helps you to build up complex forms from simple beginnings. It is, basically, about seeing the world around you in terms of fundamental shapes, which is a very powerful way to approach drawing.
So, do not stop with just airplanes. Let your curiosity lead you to new drawing adventures. Every new thing you try to draw helps you build your confidence and expand your artistic abilities. It is, you know, a continuous process of learning and discovery. The more you draw, the more comfortable you will become with your tools and your own creative style. This really is just the start of all the wonderful things you can put on paper.
Final Summary
This guide walked through the simple steps of drawing an airplane, starting with basic outlines and moving to adding specific details. We explored how to begin with general shapes, like curves and lines, to form the main body of the aircraft. The instructions focused on making the process easy for everyone, including beginners and younger artists, by breaking down the drawing into manageable parts. We also looked at how to approach different views, such as the three-quarters perspective, and how this helps in showing more of the plane. The discussion included adding smaller features like windows, engines, and tails, which bring the drawing to life. Finally, the guide touched upon the variety of airplanes one can draw, from passenger jets to fighter planes and vintage models, encouraging continued practice and exploration of other drawing subjects using the same fundamental techniques.