Have you ever looked at a face you're trying to draw and felt a bit stuck when you got to the nose? It happens to many people, actually. This particular part of the face can sometimes feel a little puzzling to put down on paper, yet it gives so much character to a person's look. Getting a good handle on how to draw noses can really make a big difference in your portraits and sketches, making them feel much more alive and true to life. So, if you've been wanting to get better at making these central features look just right, you're in a good spot to pick up some helpful ideas.
We're going to talk about ways to approach drawing noses from all sorts of viewpoints, whether you are looking straight at them, from the side, or even at an angle. It's really about understanding a few simple ideas that can help you get past any feelings of being unsure. You will find that once you begin to see the nose not as one big, complicated thing, but as a collection of simpler forms, the whole process becomes much more approachable. This way of thinking, you know, makes it easier to tackle something that might seem a bit hard at first glance, and that is a pretty good feeling.
There are some wonderful people who have shared their ways of doing this, like Wendy Nelson, who offers free drawing lessons, and Sycra Yasin, with a helpful video series that shows you how to make noses from any angle without too much fuss. We even had a chat, in a way, with a professional artist named Kelly, who has some really useful thoughts on this topic. So, we'll explore some of their ideas and methods, giving you a chance to build your confidence and maybe even find a new favorite way to approach nose drawing, which is, well, pretty cool.
Table of Contents
- Why is Nose Drawing So Puzzling?
- Simplifying the Nose Drawing Process
- How Do You Start a Nose Drawing?
- Nose Drawing - Getting the Right Angle
- What About Light and Shadow in Nose Drawing?
- Adding Realistic Touches to Your Nose Drawing
- Can Anyone Learn Nose Drawing Step by Step?
- Exploring Different Nose Drawing Styles
Why is Nose Drawing So Puzzling?
Many folks find that drawing the nose can feel like a bit of a head-scratcher. It's not flat, you see; it sticks out from the face and has all these subtle curves and bumps that can be hard to capture just right. It's almost, in a way, like trying to draw a small, three-dimensional sculpture on a flat piece of paper. This can make it feel a little frustrating when you're first starting out, or even when you've been drawing for a while. You might feel like you're getting the eyes and mouth okay, but then the nose just doesn't seem to sit properly on the face, and that is a common feeling, actually.
The issue often comes from trying to draw the nose as a single, solid object, rather than seeing it as a collection of smaller, simpler forms. People often try to draw the outline of the nose first, which can make it look flat or a bit odd. This is pretty much what makes it a bit of a puzzle for many budding artists. It's not about getting every tiny wrinkle or shadow down at the start, but rather about seeing the bigger picture, or perhaps, the bigger shapes, that make up this central facial feature. So, we'll talk about breaking it down, which can be quite helpful.
Think about it like this: the nose, really, has a certain structure underneath its surface. It's not just a soft lump; it has bone and cartilage that give it its shape. Trying to draw it without thinking about these underlying parts can make your drawing look less convincing. So, we want to figure out how to see those hidden structures, even when we can't actually see them. This way of looking at things, you know, can really help you get a better sense of how to put the nose onto your paper in a way that feels natural and believable, and that's what we're aiming for.
Simplifying the Nose Drawing Process
To make the whole nose drawing experience a lot less complicated, a really good idea is to take the overall structure of the nose and break it down into its most basic, straightforward shapes. Instead of seeing a nose, try to see a few simple forms, like a box, a cylinder, or maybe even a small ball. This kind of thinking can truly change how you approach the drawing, making it feel much more manageable. It's a bit like building something with blocks; you start with the big, simple pieces before you add the smaller, more detailed ones, and that is a pretty good way to go about it, actually.
For example, you might think of the main part of the nose as a sort of wedge or a block, and the tip as a small sphere, with the nostrils as little curved shapes. By using your pencil to sketch out these simple forms first, you're setting up a strong base for the nose. These initial lines aren't meant to be perfect or final; they are just there to help you place things correctly and get the overall size and position right. This method, you know, really helps to prepare the basic form of the nose before you start adding any of the finer details, which makes the whole thing feel a lot less intimidating.
Professional artist Kelly, for instance, often talks about this idea of simplifying forms. She suggests that by seeing these basic shapes, you can get a better sense of how light will fall on the nose and how shadows will form, even before you start shading. It's about building a solid foundation, basically. This initial step, where you just lay down these simple shapes, gives you a framework to work within. It helps you avoid getting lost in the tiny parts too soon, which, you know, can sometimes make a drawing look a bit off. So, starting simple is definitely a good plan.
How Do You Start a Nose Drawing?
When you're ready to put pencil to paper and begin your nose drawing, a very common and helpful way to start is by drawing a small, well-formed circle on the lower part of your paper. This circle doesn't have to be absolutely perfect, but it should be a good, clear shape. This initial circle acts as a kind of anchor, giving you a central point from which to build the rest of the nose. It's almost like marking the spot where the tip of the nose will eventually be, which is pretty useful for placement, you know.
From this starting circle, you can then add a few basic lines that will act as guides for the rest of the nose's structure. These might be lines that suggest the bridge of the nose, or lines that extend out to where the nostrils will be. Think of these as very light, tentative marks, just there to help you map out the general shape and size. They're not meant to be dark or permanent, just hints that show you where things are going to go. This way, you're building up the nose bit by bit, rather than trying to draw the whole thing all at once, which can be a bit overwhelming, frankly.
Wendy Nelson, in her drawing lessons, often shows how these initial pencil strokes and guidelines can make a big difference. She demonstrates how these simple starting points can lead to a really believable nose. It's about giving yourself a roadmap, in a way, so you don't feel lost as you add more details. This method helps you to keep the overall proportions in mind, which is pretty important for making the nose look like it belongs on the face. So, starting with that little circle and some light lines is a really good first step, honestly.
Nose Drawing - Getting the Right Angle
One of the things that can make nose drawing feel a little challenging is trying to get it right from different viewpoints. A nose looks very different when you see it straight on, compared to when you see it from the side, or even at a slight angle. It's like trying to draw the same object from various perspectives, and each one presents its own set of things to consider. So, understanding how the nose changes its appearance based on the angle you're looking at is pretty key to making your drawings feel more natural, you know.
When you're drawing a nose from the front, for instance, you'll be focusing a lot on the width and the general shape of the nostrils and the tip. The bridge of the nose might appear as a relatively flat area, with subtle shadows on either side. However, if you're drawing the nose in profile, meaning from the side, you'll be paying much more attention to the overall curve and projection of the nose from the face. You'll see the height of the bridge, the dip before the tip, and the curve of the nostril opening, which is quite different, obviously.
And then there's the angled view, which can sometimes feel like the most complex, as it combines elements of both the front and profile views. You'll see a bit of the bridge, a bit of the tip, and one nostril might be more visible than the other. Sycra Yasin, in his video course, does a great job of showing how to handle these different angles with ease. He helps you see how the basic shapes you started with can be rotated and adjusted to fit whatever viewpoint you're going for. It's about understanding how those simple forms twist and turn in space, which is, you know, really helpful for your nose drawing skills.
What About Light and Shadow in Nose Drawing?
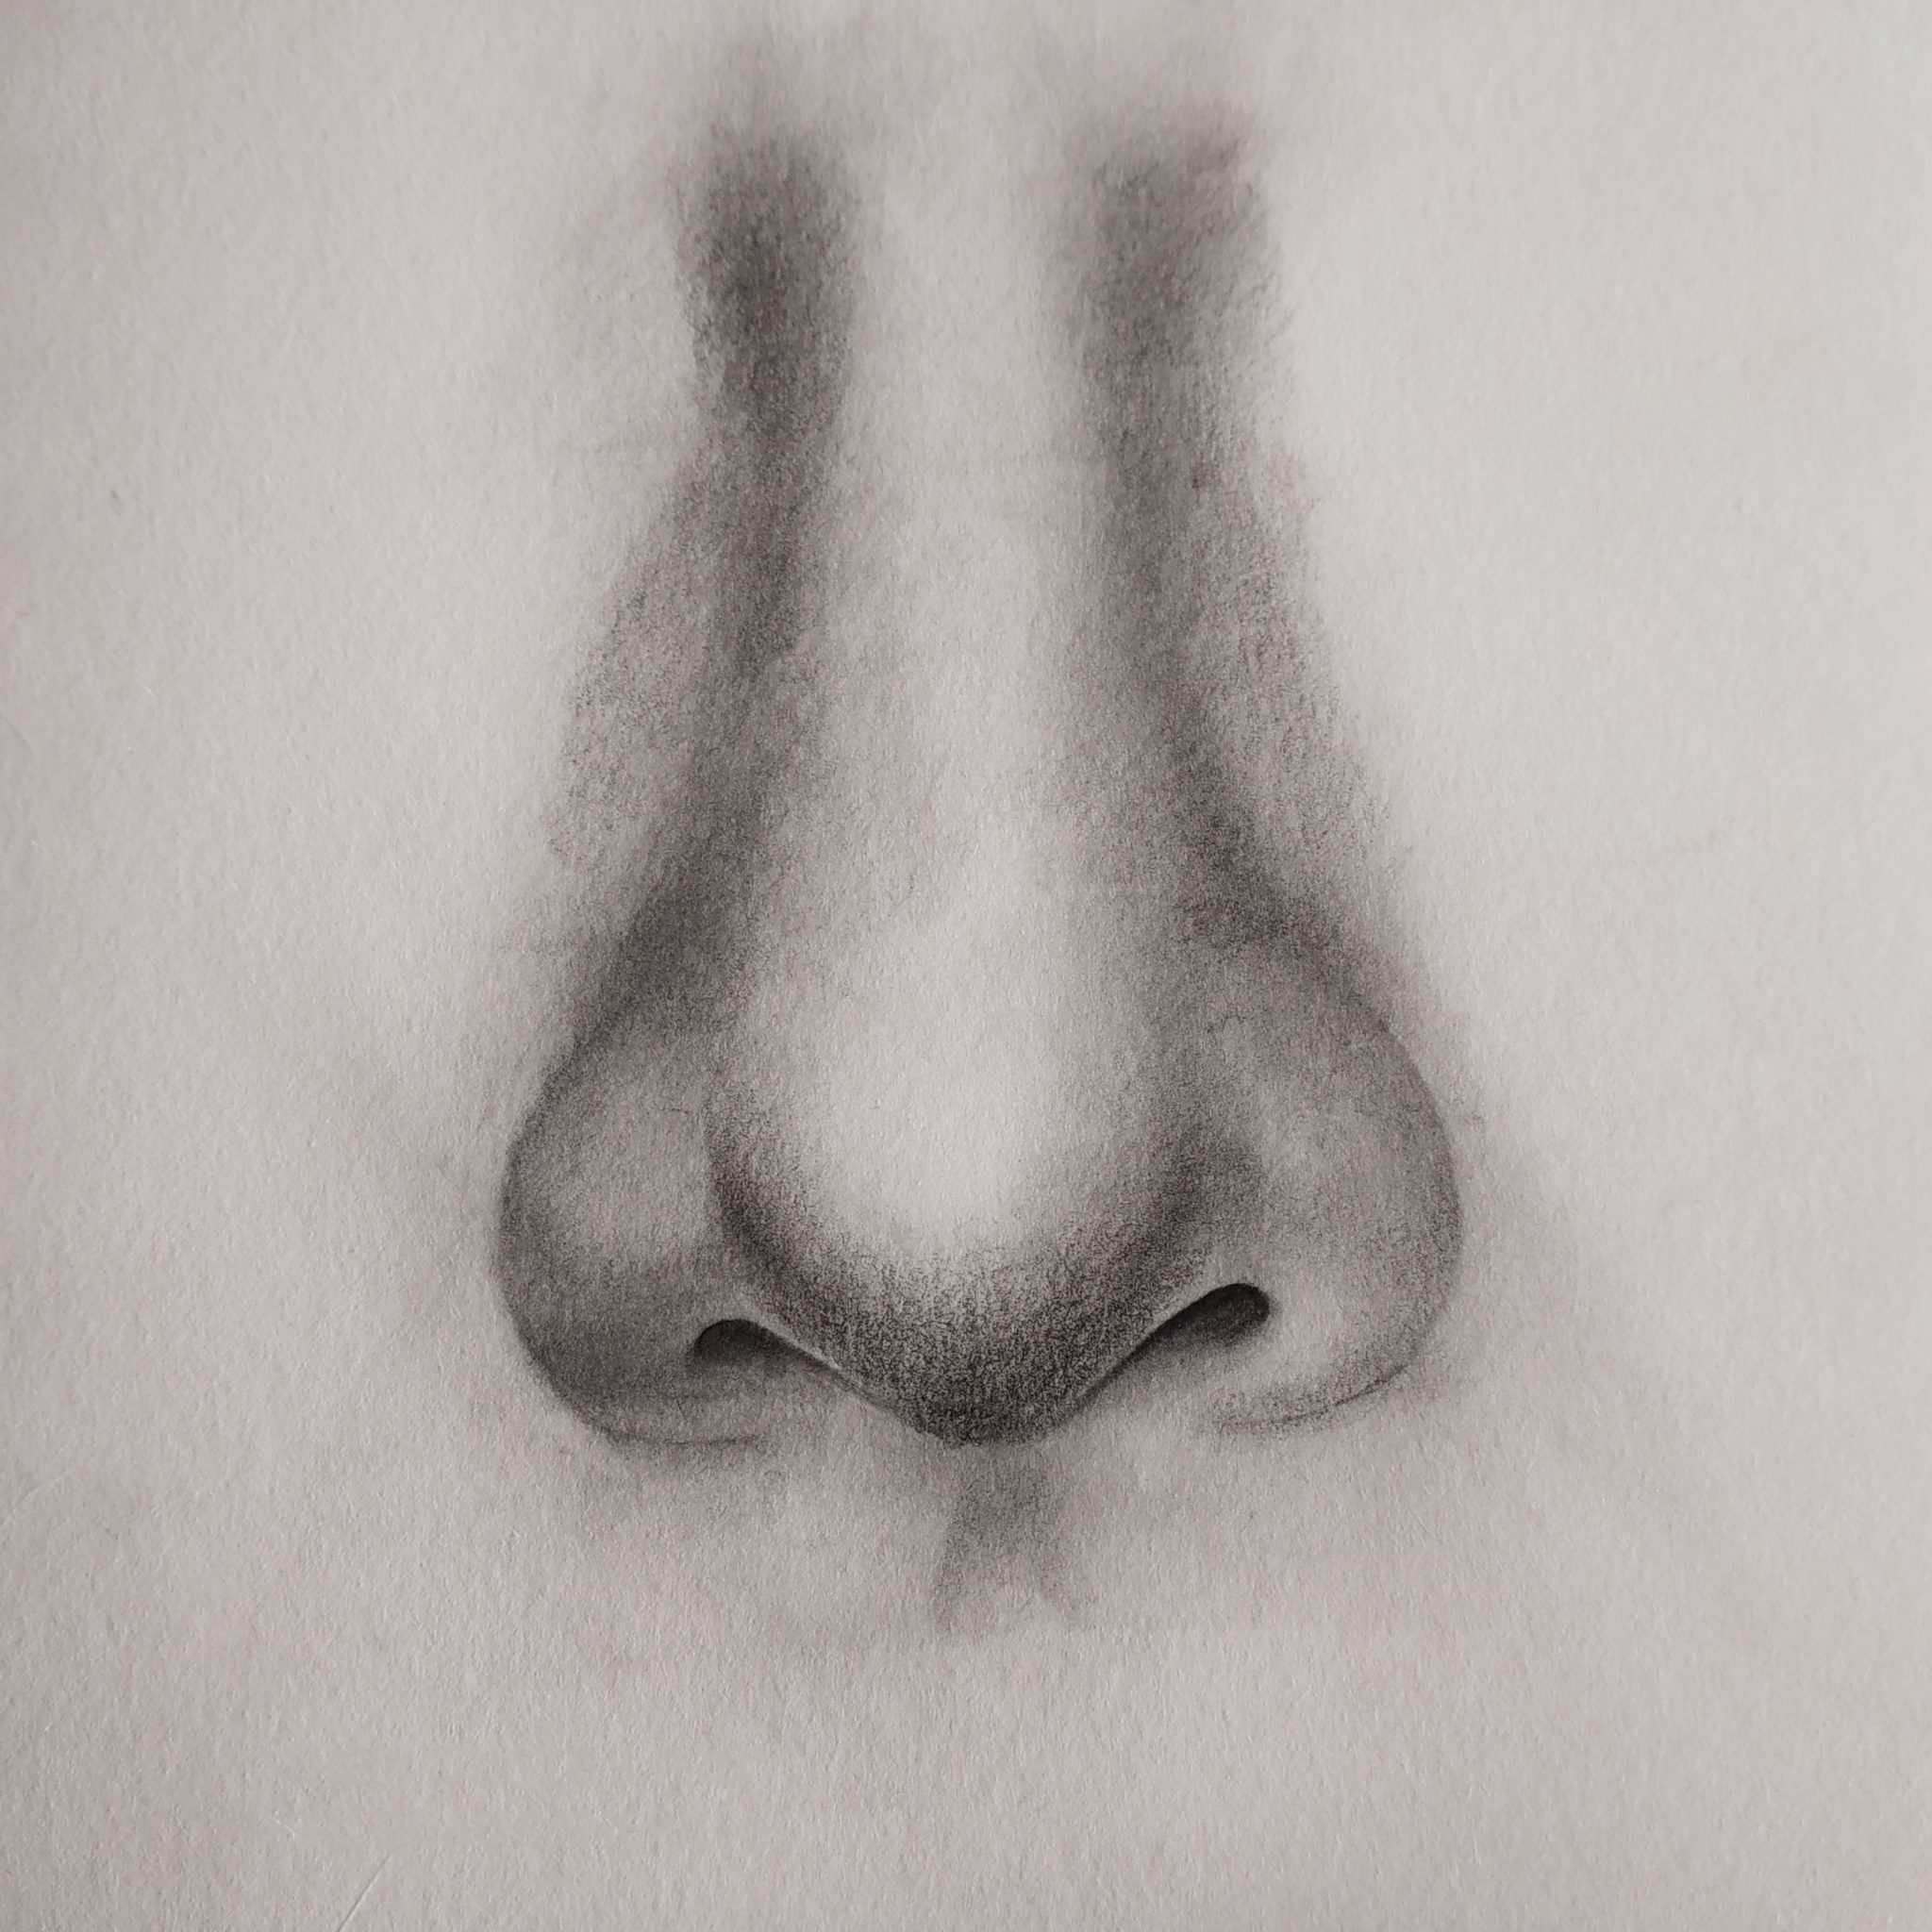
Once you have the basic shapes and angles of your nose drawing laid out, the next really important step is to think about how light hits the nose and how shadows are formed. Light and shadow are what give a drawing its sense of depth and make it look like it's actually sticking out from the paper. Without them, a nose can look flat and lifeless, which is something we definitely want to avoid, you know. So, understanding how to use light and dark areas is pretty much essential for making your nose look believable.
Because the nose is a three-dimensional form, it will have parts that catch the light directly, parts that are in partial shadow, and parts that are in deep shadow. The bridge of the nose, for example, often catches a highlight, while the areas underneath the nostrils or on the sides of the nose might be darker. It's about observing where the light source is coming from and then figuring out how that light would interact with the curves and planes of the nose. This really helps to give your nose drawing a sense of form and volume, which is, well, quite satisfying to see.
You can use different levels of pencil pressure or different shading techniques to create these varying degrees of light and dark. A lighter touch for areas that are brighter, and more pressure or layered strokes for areas that are darker. This exploration of lighting and shadows is what truly brings a nose drawing to life. It's not just about drawing lines; it's about shaping the nose with tone. So, take your time to really look at how light plays on a nose, whether it's a real one or a photo, and try to copy those light and dark areas. It really does make a big difference, honestly.
Adding Realistic Touches to Your Nose Drawing
After you've got the general shape and the light and shadow in place for your nose drawing, you might want to add some touches that make it look even more like a real nose. This is where you can start thinking about the smaller details, the little bumps, the subtle curves, or perhaps the texture of the skin. It's about refining what you've already put down, making it feel more like a living, breathing part of a face. This can be a really fun part of the process, actually, seeing your drawing start to take on a very true-to-life appearance.
Some people like their drawings to be very true to life, showing every tiny part, while others prefer a more simplified or styled look. The good news is that the foundational steps of breaking down the nose into shapes and understanding light work for both approaches. If you're going for a really true-to-life nose drawing, you might pay closer attention to the slight variations in skin tone, the way the light catches the very edge of a nostril, or the subtle shadow cast by the tip of the nose. It's about observing closely and adding those tiny bits that make it feel genuine, you know.
You can use your pencil to create very fine lines for small details, or gentle smudging for soft transitions between light and shadow. The key here is not to overdo it; sometimes, less is more when it comes to adding these touches. A few well-placed marks can suggest a lot without having to draw every single thing. So, take your time, step back from your drawing now and then to see how it's coming along, and decide what little additions will make your nose drawing feel just right for you. It's pretty much about making it your own, in a way.
Can Anyone Learn Nose Drawing Step by Step?
The really good news is that, yes, pretty much anyone can get comfortable with nose drawing, especially when it's broken down into easy-to-follow steps. It's not some secret skill only a few people are born with; it's something you can learn and get better at with a little practice and some helpful guidance. Think of it like learning to cook a new dish; you follow a recipe, step by step, and before you know it, you've made something delicious. Drawing a nose can be very similar, honestly.
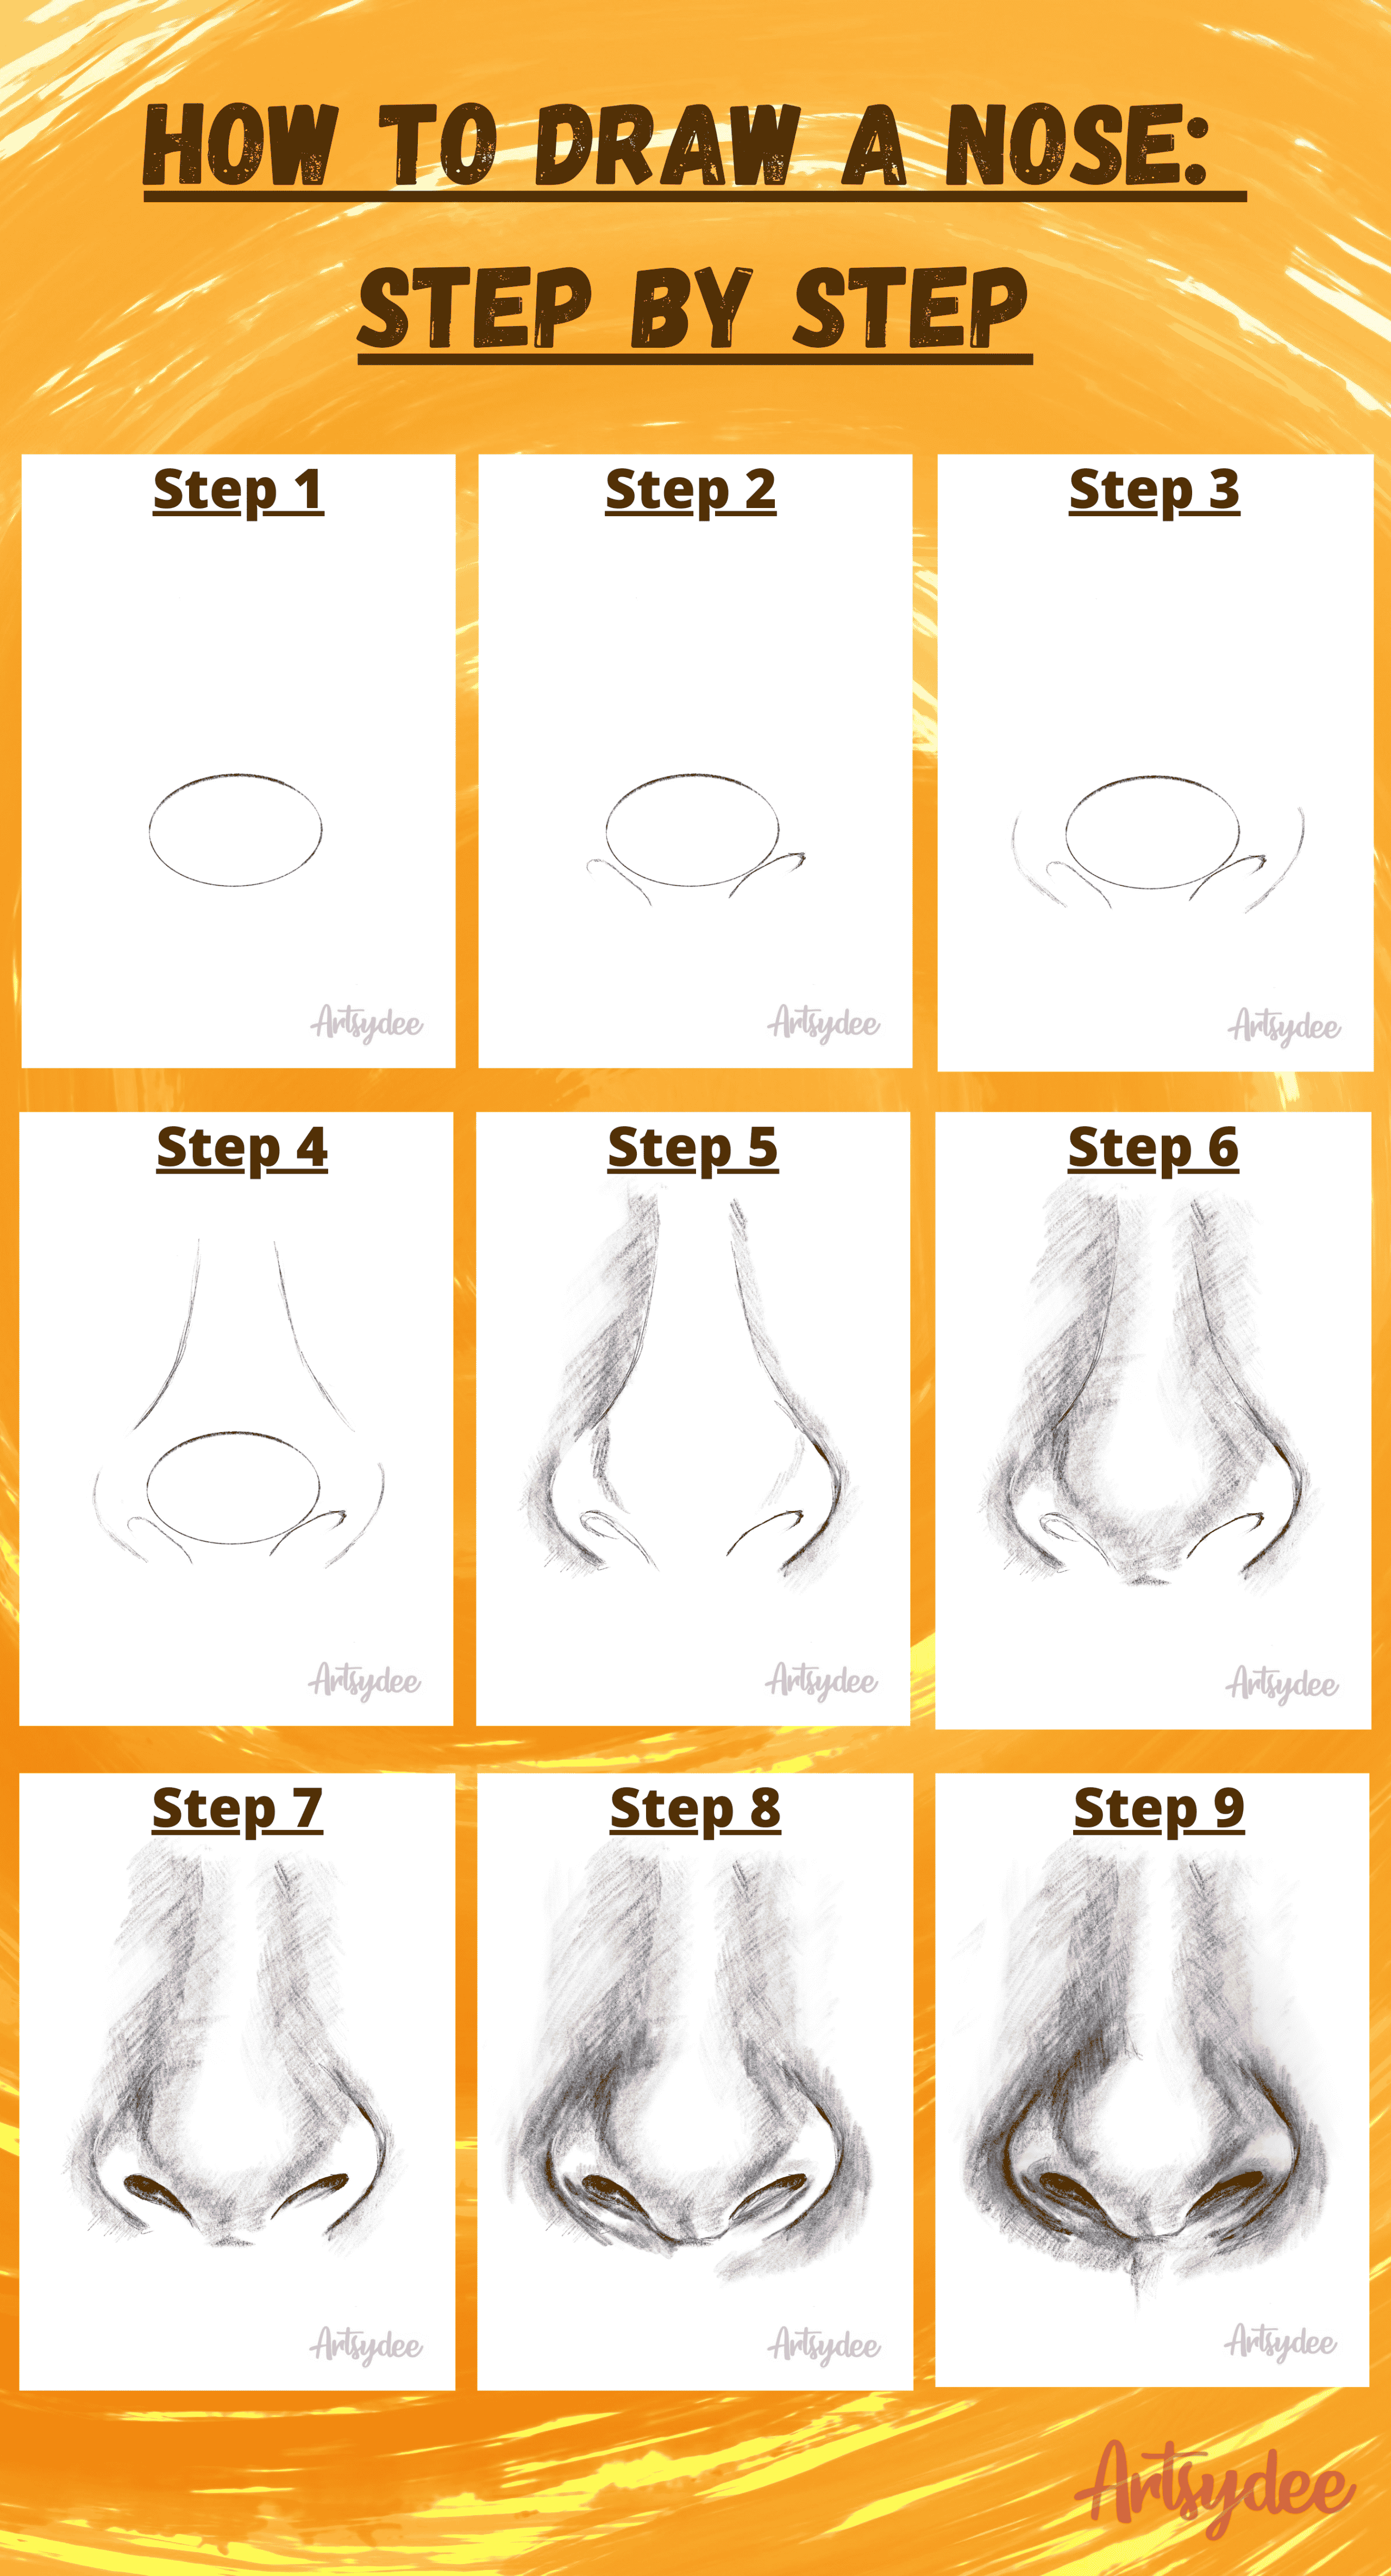
We've found a guide, for instance, that lays out how to draw a nose in nine steps that are very straightforward and not too complicated. This kind of step-by-step approach is fantastic because it takes what might seem like a big task and turns it into a series of small, manageable actions. You don't have to figure everything out all at once. You just follow one instruction, then the next, and gradually, the nose starts to appear on your paper. This makes the whole process feel a lot less intimidating, which is pretty important for keeping your spirits up while learning.
These step-by-step tutorials often start with those initial simple shapes, like the circle we talked about, and then slowly build up the complexity. They guide you through adding the basic forms, then the main lines, then the shadows, and finally the smaller details. It's a very supportive way to learn, giving you clear directions at each stage. So, if you've ever felt like nose drawing was beyond your reach, know that there are resources out there, like these step-by-step guides, that can really help you get the hang of it, and that is a truly good thing, you know.
Exploring Different Nose Drawing Styles
Once you start feeling more at ease with the basic ways of drawing a nose, you'll find that there are all sorts of different looks you can create. Just like people have a wide variety of nose shapes in real life, you can learn to draw them all, from very distinct ones to those that are more subtle. It's about getting comfortable with the underlying structure, and then being able to change it slightly to fit the specific kind of nose you're trying to put down on paper. This can be a really fun part of nose drawing, honestly, seeing all the possibilities.
Some noses might be wider at the base, others might have a more pronounced bridge, and some might have a very small, rounded tip. By understanding how to adjust your initial shapes and guidelines, you can pretty much draw any type of nose you see. It's not about drawing one specific nose perfectly every time, but about having the skills to adapt your approach to different forms. This adaptability is what really helps you grow as an artist, allowing you to tackle a wider range of faces and characters, which is, you know, quite useful.
Whether you want to draw noses that look incredibly true to life, or if you prefer a more expressive, stylized approach for your characters, the fundamental ideas remain the same. The process of simplifying the nose into basic shapes, considering the angles, and thinking about light and shadow will always be helpful. So, keep practicing, keep observing the many kinds of noses you see around you, and have fun exploring all the different ways you can bring them to life on your paper. It's a journey of discovery, in a way, and you'll get better with every attempt, that is for sure.