There's a good chance you've looked at your lawn, maybe after a fresh cut, and noticed something a little off. Perhaps the grass tips look torn, or they've got that sort of brownish tint just a day or two later. That, you know, often points to a dull lawn mower blade. But here's the thing: getting those blades back in shape isn't some big, complicated chore that needs a special degree. It's actually a pretty straightforward bit of upkeep you can do yourself.
Keeping your lawn mower blades nice and sharp is really a big deal for the health and look of your yard, you see. A sharp blade makes a clean cut, which helps your grass recover quicker and keeps it looking its best. When your blades are dull, they tear at the grass rather than slicing it cleanly, and that can lead to all sorts of problems for your lawn's overall well-being. It's almost like giving your grass a bad haircut, in a way.
Many people might think that learning how to sharpen lawn mower blades is a tough task, something for a professional, but honestly, it’s often much simpler than it sounds. Most of the time, you can get the job done in less than twenty minutes, just using some basic things you might already have around the house. We're going to talk about the steps involved, and how easy it really can be to bring those blades back to life. So, let's get into it.
Table of Contents
- Getting Ready to Sharpen Lawn Mower Blades - What Do You Do First?
- Why Does Knowing When to Sharpen Lawn Mower Blades Matter for Your Yard?
- Taking Off Your Lawn Mower Blade - A Key Step to Sharpen Lawn Mower Blades
- Giving Your Blade a Good Look and Clean Before You Sharpen Lawn Mower Blades
- How to Sharpen Lawn Mower Blades by Hand - Tools and Steps
- How to Sharpen Lawn Mower Blades with Machines - What Are Your Options?
- After You Sharpen Lawn Mower Blades - The Finishing Touches and Balancing Act
Getting Ready to Sharpen Lawn Mower Blades - What Do You Do First?
Before you even think about touching those blades, it's really a good idea to put on some sturdy gloves. Your hands, you know, are pretty important, and a lawn mower blade, even a dull one, can still give you a nasty cut. So, getting some good, thick work gloves on is a simple way to keep your fingers and palms safe from any unexpected slips or sharp edges. It's just a basic step, but it makes a big difference in keeping you out of harm's way while you're working on the mower. You want to feel comfortable and secure, and gloves help with that, you see.
After you've got your hands protected, the very next thing to do is disconnect the mower's spark plug. This is, basically, the most important safety step you can take. You see, if that spark plug is connected, there's always a chance, even a small one, that the engine could accidentally start while you're working on it. That would be, well, obviously not good at all. So, pulling that spark plug wire off is like turning off the power to a light switch; it makes sure the mower absolutely cannot come to life while your hands are anywhere near the blades. It's a quick, simple action that keeps you very safe, as a matter of fact.
Once those two things are done, you can then tip the mower onto its side. This gives you a good view of the blade underneath. Before you do anything else, you'll want to give that area a good wipe. There's often a lot of caked-on grass and dirt under there, and getting rid of that gunk first makes the whole job a lot cleaner and easier. You want a clear surface to work with, naturally. This initial cleaning also helps you get a better look at the blade itself, so you can see any damage or wear it might have. It's a bit like getting a fresh canvas ready, you know, before you start painting.
Why Does Knowing When to Sharpen Lawn Mower Blades Matter for Your Yard?
Knowing when to sharpen your lawn mower blade is, honestly, a very important part of keeping your lawn looking its best and staying healthy. A dull blade, you see, doesn't cut the grass cleanly. Instead, it tears at the grass tips. This tearing creates ragged edges on the grass blades. It's not a neat snip; it's more like a rip, you know. These torn ends are pretty vulnerable, and they can turn brown after just a few days, making your whole lawn look tired and unhealthy. It's a bit like having split ends on your hair, in a way.
Beyond just looking bad, those ragged edges can also invite other problems. They create open wounds on the grass, which makes it easier for fungi and other sorts of issues to take hold. A healthy lawn is more resistant to these kinds of things, but a lawn that's constantly being damaged by a dull blade is, well, more susceptible to getting sick. So, understanding the signs that your blade needs a refresh, like those brown tips or a generally uneven cut, helps you keep your lawn strong and green. It's really about giving your grass the best chance to thrive, you know, rather than just survive.
Taking Off Your Lawn Mower Blade - A Key Step to Sharpen Lawn Mower Blades
Once your mower is tipped over and safe, the next big step is to take the blade right off the machine. This is, in most cases, the best way to sharpen lawn mower blades. Trying to sharpen them while they're still attached to the mower can be awkward, and it's just not as effective. When you remove the blade, you can work on it much more freely and safely. It also lets you take care of the sharpening and balancing at the same time, which is really important for a good, even cut later on. It's like taking a tool off a workbench to properly fix it, you know, rather than trying to fix it while it's still bolted down.
Removing the blade usually involves loosening a bolt or two that holds it in place. You might need a wrench for this, and sometimes those bolts can be pretty tight, so be ready to apply a bit of force. Remember, you're still working around a potentially sharp object, even if it's dull, so keep those gloves on. Once the bolt is loose, the blade should come off pretty easily. You want to make sure you remember which way it was facing, too, so you can put it back on correctly later. It's a simple detail, but it matters for how the mower cuts. Basically, this step gets you ready for the real work of making that blade sharp again.
Giving Your Blade a Good Look and Clean Before You Sharpen Lawn Mower Blades
After you've got the blade off, it's a good time to give it a proper inspection and a thorough cleaning. Even if you wiped down the underside of the mower, the blade itself can have a lot of stuck-on grass and debris. This stuff needs to come off before you start sharpening, honestly. You can use a wire brush or a scraper to get rid of any caked-on bits. A clean blade allows you to see any nicks, bends, or other damage that might be present. It's really about getting a clear picture of what you're working with, you know.
Looking closely at the blade is important because it helps you decide how much sharpening it actually needs. You're looking for any big dents or cracks, too. If the blade is really bent or has significant damage, it might be better to replace it entirely rather than trying to sharpen it. But for typical dullness, a good cleaning and a careful look will tell you where to focus your sharpening efforts. It's like preparing a surface before you paint it; you want it to be clean and ready for the next step, you see, to get the best outcome.
How to Sharpen Lawn Mower Blades by Hand - Tools and Steps
Sharpening a lawn mower blade by hand is, in some respects, a very satisfying way to do it, and it often uses just a few simple tools. This method is great if you don't have access to power tools or prefer a more controlled approach. The main tools you'll typically use for hand sharpening are metal files or various abrasive stones. These allow you to slowly and carefully remove metal from the blade's cutting edge, bringing back that sharpness. It's a bit like sharpening a kitchen knife by hand, just on a bigger scale, you know.
The overall idea is to work along the existing bevel, or angled edge, of the blade. You want to maintain that angle as you file, rather than creating a new one. This ensures the blade cuts correctly when it's back on the mower. It's a process that requires a little patience, but it's not at all difficult to learn. Many people find that this method gives them a lot of control over the sharpening process, allowing for a very precise edge. It's a pretty traditional way to sharpen, actually, and it works quite well for most home users.
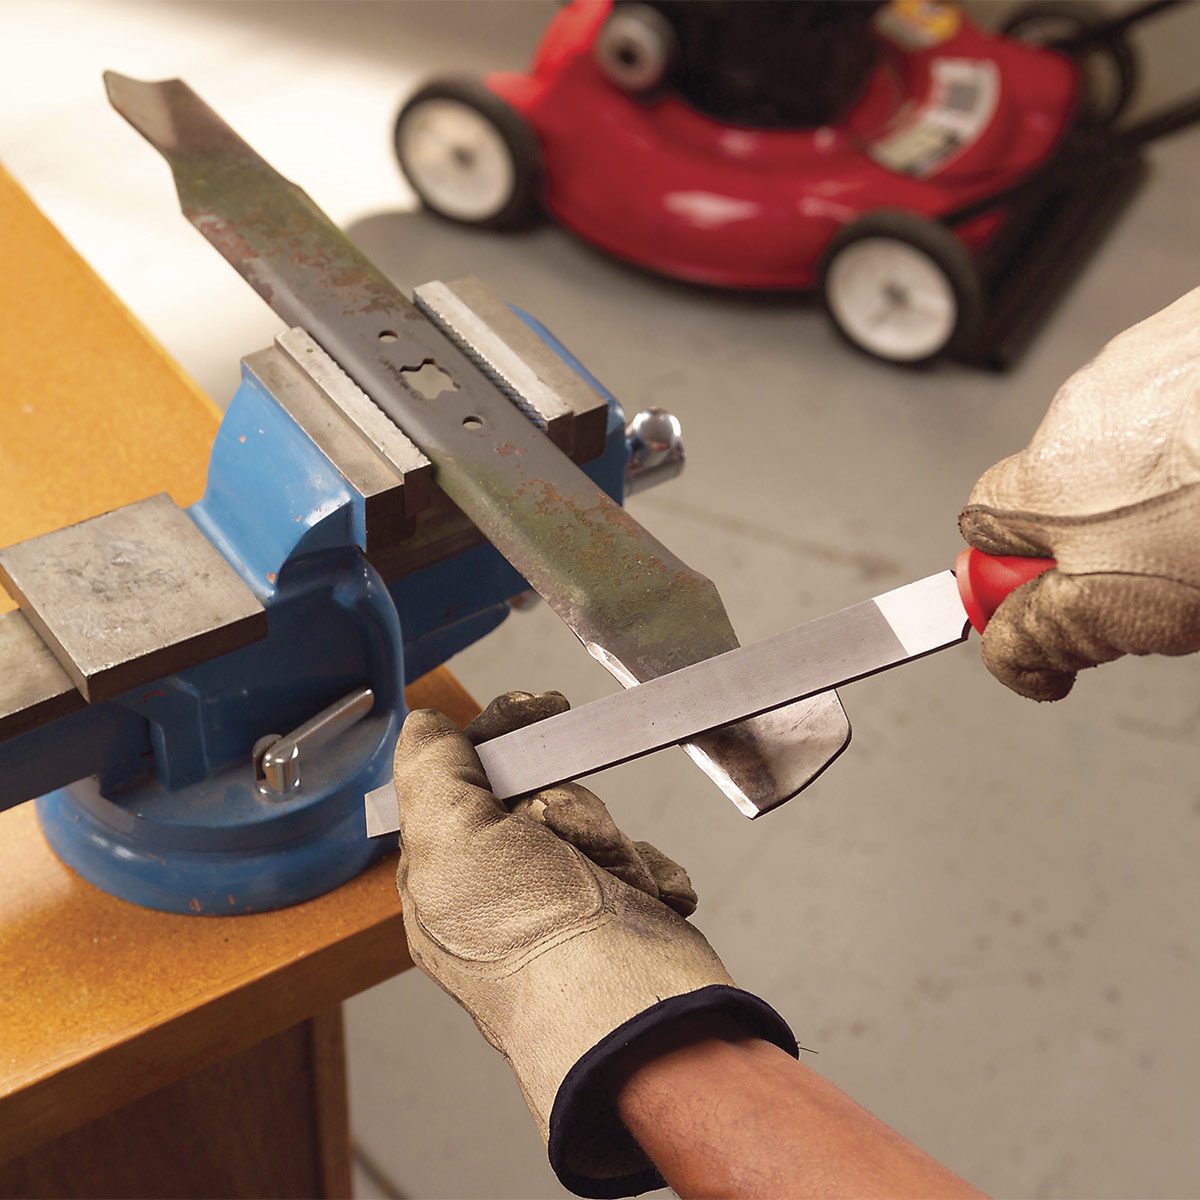
Using a Flat File to Sharpen Lawn Mower Blades - A Simple Method
A flat file is, honestly, a really easy tool to use for sharpening a dull blade, and it's a very common choice for home sharpening. To use a flat file, you first need to secure the blade. This means putting it firmly in a vice or clamping it down to a sturdy workbench. You want the blade to be absolutely still so it doesn't move around while you're working on it. This makes the job safer and much more effective, you know. A steady blade is key for a good, even sharpening.
Once the blade is held firmly, you apply pressure to the file and run it along the cutting edge. You'll want to push the file in one direction, typically away from you, across the angled part of the blade. Lift the file on the return stroke. You're essentially shaving off tiny bits of metal, gradually making the edge sharper. It's important to keep the same angle that the blade already has. You're not trying to create a new angle, just refine the existing one. Do this on both sides of the blade, working evenly, until you feel a burr, a slight curl of metal, on the opposite side of the edge. That burr tells you you've sharpened the edge sufficiently, you see.
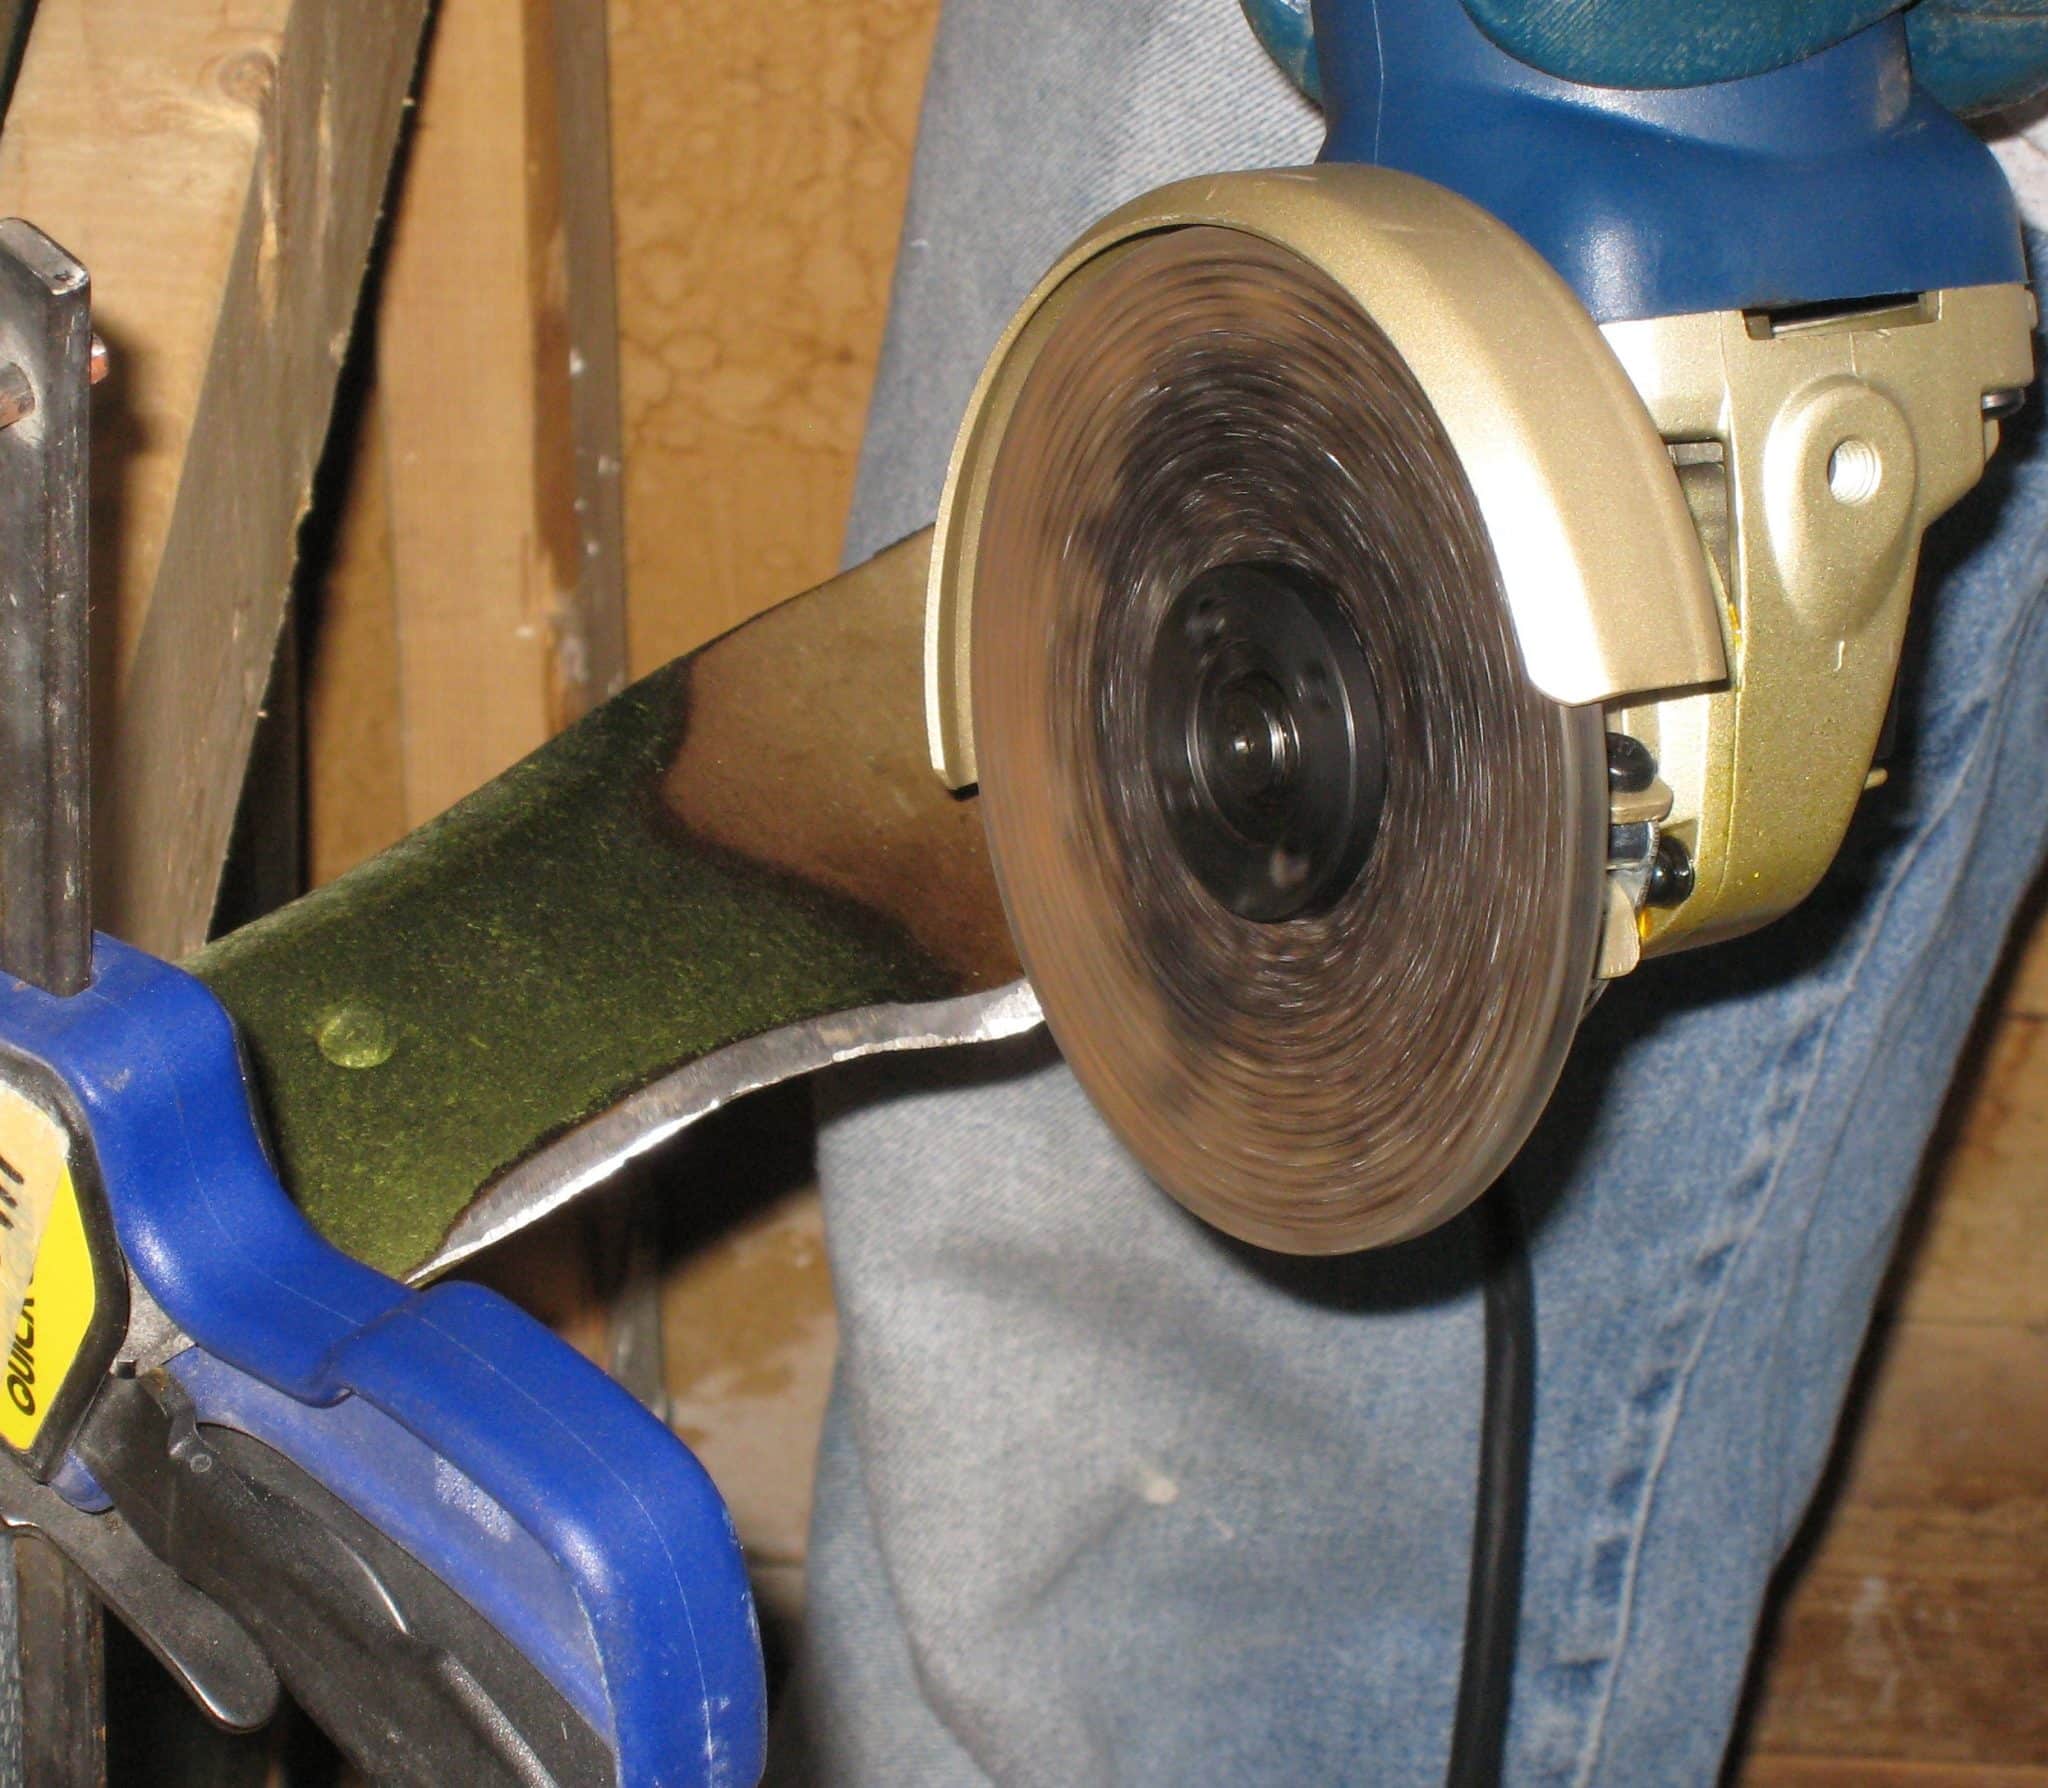
How to Sharpen Lawn Mower Blades with Machines - What Are Your Options?
If you prefer a faster method, or if your blades are particularly dull, sharpening a blade by machine can be a good option. There are a few different tools you might use for this, including a dedicated blade sharpener, a bench grinder, or an angle grinder. Each of these tools uses a spinning abrasive wheel or disc to remove metal from the blade's edge. They can make quick work of a dull blade, but they do require a bit more care and attention to safety, you know, because of the speed and power involved.
When using a bench grinder, for example, you'll typically hold the blade against the spinning grinding wheel. It's important to move the blade across the wheel slowly. You also need to apply only light pressure. This is very important to avoid overheating the blade. If the blade gets too hot, it can lose its temper, which means it becomes softer and won't hold an edge as well. You'll often see people dip the blade in water periodically to keep it cool while they're working. It's a bit like cooking, where you don't want to burn the food, you know, just get it right.
An angle grinder is another tool that can be used for sharpening, and it offers a bit more flexibility since it's handheld. With an angle grinder, you're bringing the tool to the blade, rather than the blade to the tool. Again, the principle is the same: slowly move the abrasive disc along the cutting edge, maintaining the original angle. Light pressure is still key here, too, for the same reasons of avoiding heat buildup. It takes a steady hand and a good feel for the angle, but it can certainly get the job done quickly. You want to make sure you're wearing all your safety gear, like eye protection, obviously, when using any of these power tools.
After You Sharpen Lawn Mower Blades - The Finishing Touches and Balancing Act
After you've finished sharpening, whether by hand or machine, there's one more important step: deburring. When you sharpen an edge, especially with a grinder, a tiny, almost invisible curl of metal, called a burr, forms on the opposite side of the cutting edge. This burr needs to be removed for a truly clean and effective cutting edge. You can often remove it by lightly running a file or a sharpening stone along the flat side of the blade, just skimming off that tiny bit of extra metal. It's a bit like sanding down a piece of wood after you've cut it, you know, to get rid of any rough spots.
Removing the burr makes the edge much cleaner and allows it to slice through grass without tearing. It's a small detail, but it makes a big difference in how well the blade performs. You want that edge to be as smooth and clean as possible, basically, to get that optimal cut on your lawn. This step also helps to prolong the life of your sharpened edge, as a burr can break off quickly and leave a less effective cutting surface. So, don't skip this last little bit of refinement.
Making Sure Your Lawn Mower Blades are Balanced After You Sharpen Lawn Mower Blades?
Making sure your lawn mower blades are balanced after you sharpen lawn mower blades is, honestly, just as important as getting them sharp. A blade that isn't balanced can cause a lot of problems. If one side is heavier than the other, the blade will wobble or vibrate when it spins at high speeds. This vibration isn't just annoying; it can put a lot of stress on your mower's engine and bearings, potentially leading to costly repairs down the road. It can also make your mower cut unevenly, leaving streaks of taller grass. It's almost like driving a car with an unbalanced tire, you know, it just doesn't feel right and causes wear and tear.
To balance the blade, you can use a blade balancer, which is a simple tool designed for this purpose. You typically hang the blade on the balancer, and if one side dips lower, it means that side is heavier. You then remove a small amount of metal from the heavier side, usually from the non-cutting edge or the very end of the blade, until it hangs perfectly level. You want it to be pretty much even, so it spins smoothly without any wobble. This step ensures that your mower runs as smoothly as possible and delivers a nice, even cut every time. It's a final, very important check, you see, before you put the blade back on and get your mower ready for action.
:max_bytes(150000):strip_icc()/sharpening-mower-blade-big-3a358c8dcf65468bbe4705f0a3221dd0.jpg)