Have you ever looked at a beautiful, blooming rose and wished you could sketch its graceful form onto paper? Well, you know, it's actually much simpler than you might think to bring that lovely flower to life with just a pencil and some paper. We are going to explore the steps together, making it easy for anyone, even if you have never really drawn anything before, to create something truly special.
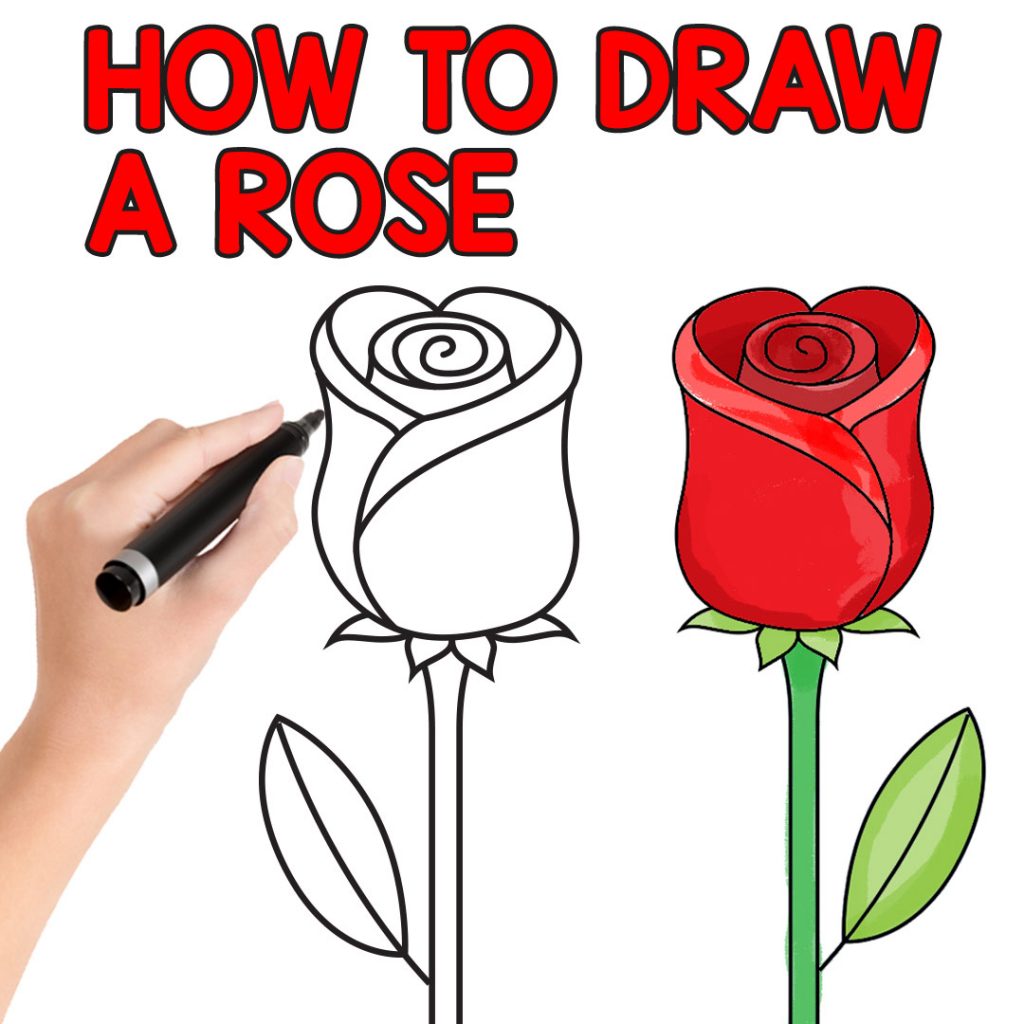
Learning how to make a rose drawing can be a very calming and satisfying activity. It’s a way to express a bit of creativity without needing a lot of fancy art tools or prior experience. This kind of drawing is, you know, perfect for making a thoughtful gift, maybe for a loved one on a special day like Valentine's Day or Mother's Day, or just for yourself, to have something pretty to look at.
We will walk through each part of the process, from picking out your basic art supplies to adding those final touches that make your rose look full and lively. You will see that with just a few simple shapes and some gentle strokes, you can make a flower that has a lot of charm and a very pleasing appearance. It really is, in a way, about enjoying the journey of making something lovely with your own hands.
Table of Contents
- Getting Started - What You'll Need to Draw a Rose
- Is Drawing a Rose Really That Simple?
- The First Strokes - How to Draw a Rose's Basic Shape
- Building the Petals - How to Draw a Rose's Flowing Form
- How Can You Make Your Rose Drawing Look Realistic?
- Adding Depth - How to Draw a Rose with Shading
- Why Practice How to Draw a Rose?
- Beyond the Basics - How to Draw a Rose with Character
- What If My Rose Drawing Doesn't Look Perfect At First?
Getting Started - What You'll Need to Draw a Rose
Before we begin to make our beautiful flower, it's good to gather a few things. You don't need a lot of special equipment, which is rather nice. Basically, you'll want some plain paper, a pencil – just a regular one will do – and an eraser. That’s pretty much it for your art supplies. These are the very simple tools that will help you make your rose drawing a reality.
Having these basic items ready means you can start creating right away. There's no need to wait for anything fancy, you know? Just grab what you have around the house. It makes the whole experience very approachable, almost like you're just doodling, but with a clear path to a really lovely outcome. So, gather your paper, your pencil, and your eraser, and let's get ready to make something pretty.
Is Drawing a Rose Really That Simple?
You might be wondering if drawing a rose, a flower with so many layers and a very intricate look, can actually be easy. Well, the good news is, yes, it can be. This way of drawing a rose is made to be super simple, which makes it a good fit for people who are just starting out, and it’s also quite fun for younger artists, like kids. It really takes away any worries you might have about it being too hard, because it breaks down the whole thing into manageable bits.
Learning how to draw this lovely flower can be a very pleasant and calm experience. It's not just about getting the lines right; it's also about finding a quiet moment to be creative. Whether you are someone who is just beginning to explore art or you’ve never picked up a pencil to draw before, this method helps you create something that looks quite nice with just a few easy shapes. It’s a very satisfying feeling to see a flower appear on your paper, almost like magic, you know?
The First Strokes - How to Draw a Rose's Basic Shape
To begin making your rose, you'll want to start by sketching a small, rounded shape. Think of it like a little, soft oval, not too big. This will be the very center, the heart of your flower. It doesn't have to be perfect, just a light outline to guide you. This initial shape is, in a way, the anchor for everything else that will follow, so just make it gentle and light.
Next, you will draw a shape that looks a bit like the letter "U" right underneath that oval you just made. Imagine it’s like a little cup or a very shallow bowl holding up your oval. This "U" shape will help give your rose its base, kind of like the part where the petals start to open up. It's a very simple addition, but it gives your drawing a lot of structure, you know, right from the start.
Then, to give your rose a bit more body, you can add a larger, wider circle around these first two shapes. Think of it as a circle that is just a little bit wider than it is tall, almost like a slightly squashed round form. This outer circle helps you, basically, plan out the overall size and shape of your blooming flower. It's a very helpful guide, especially when you are trying to keep things balanced and visually appealing.
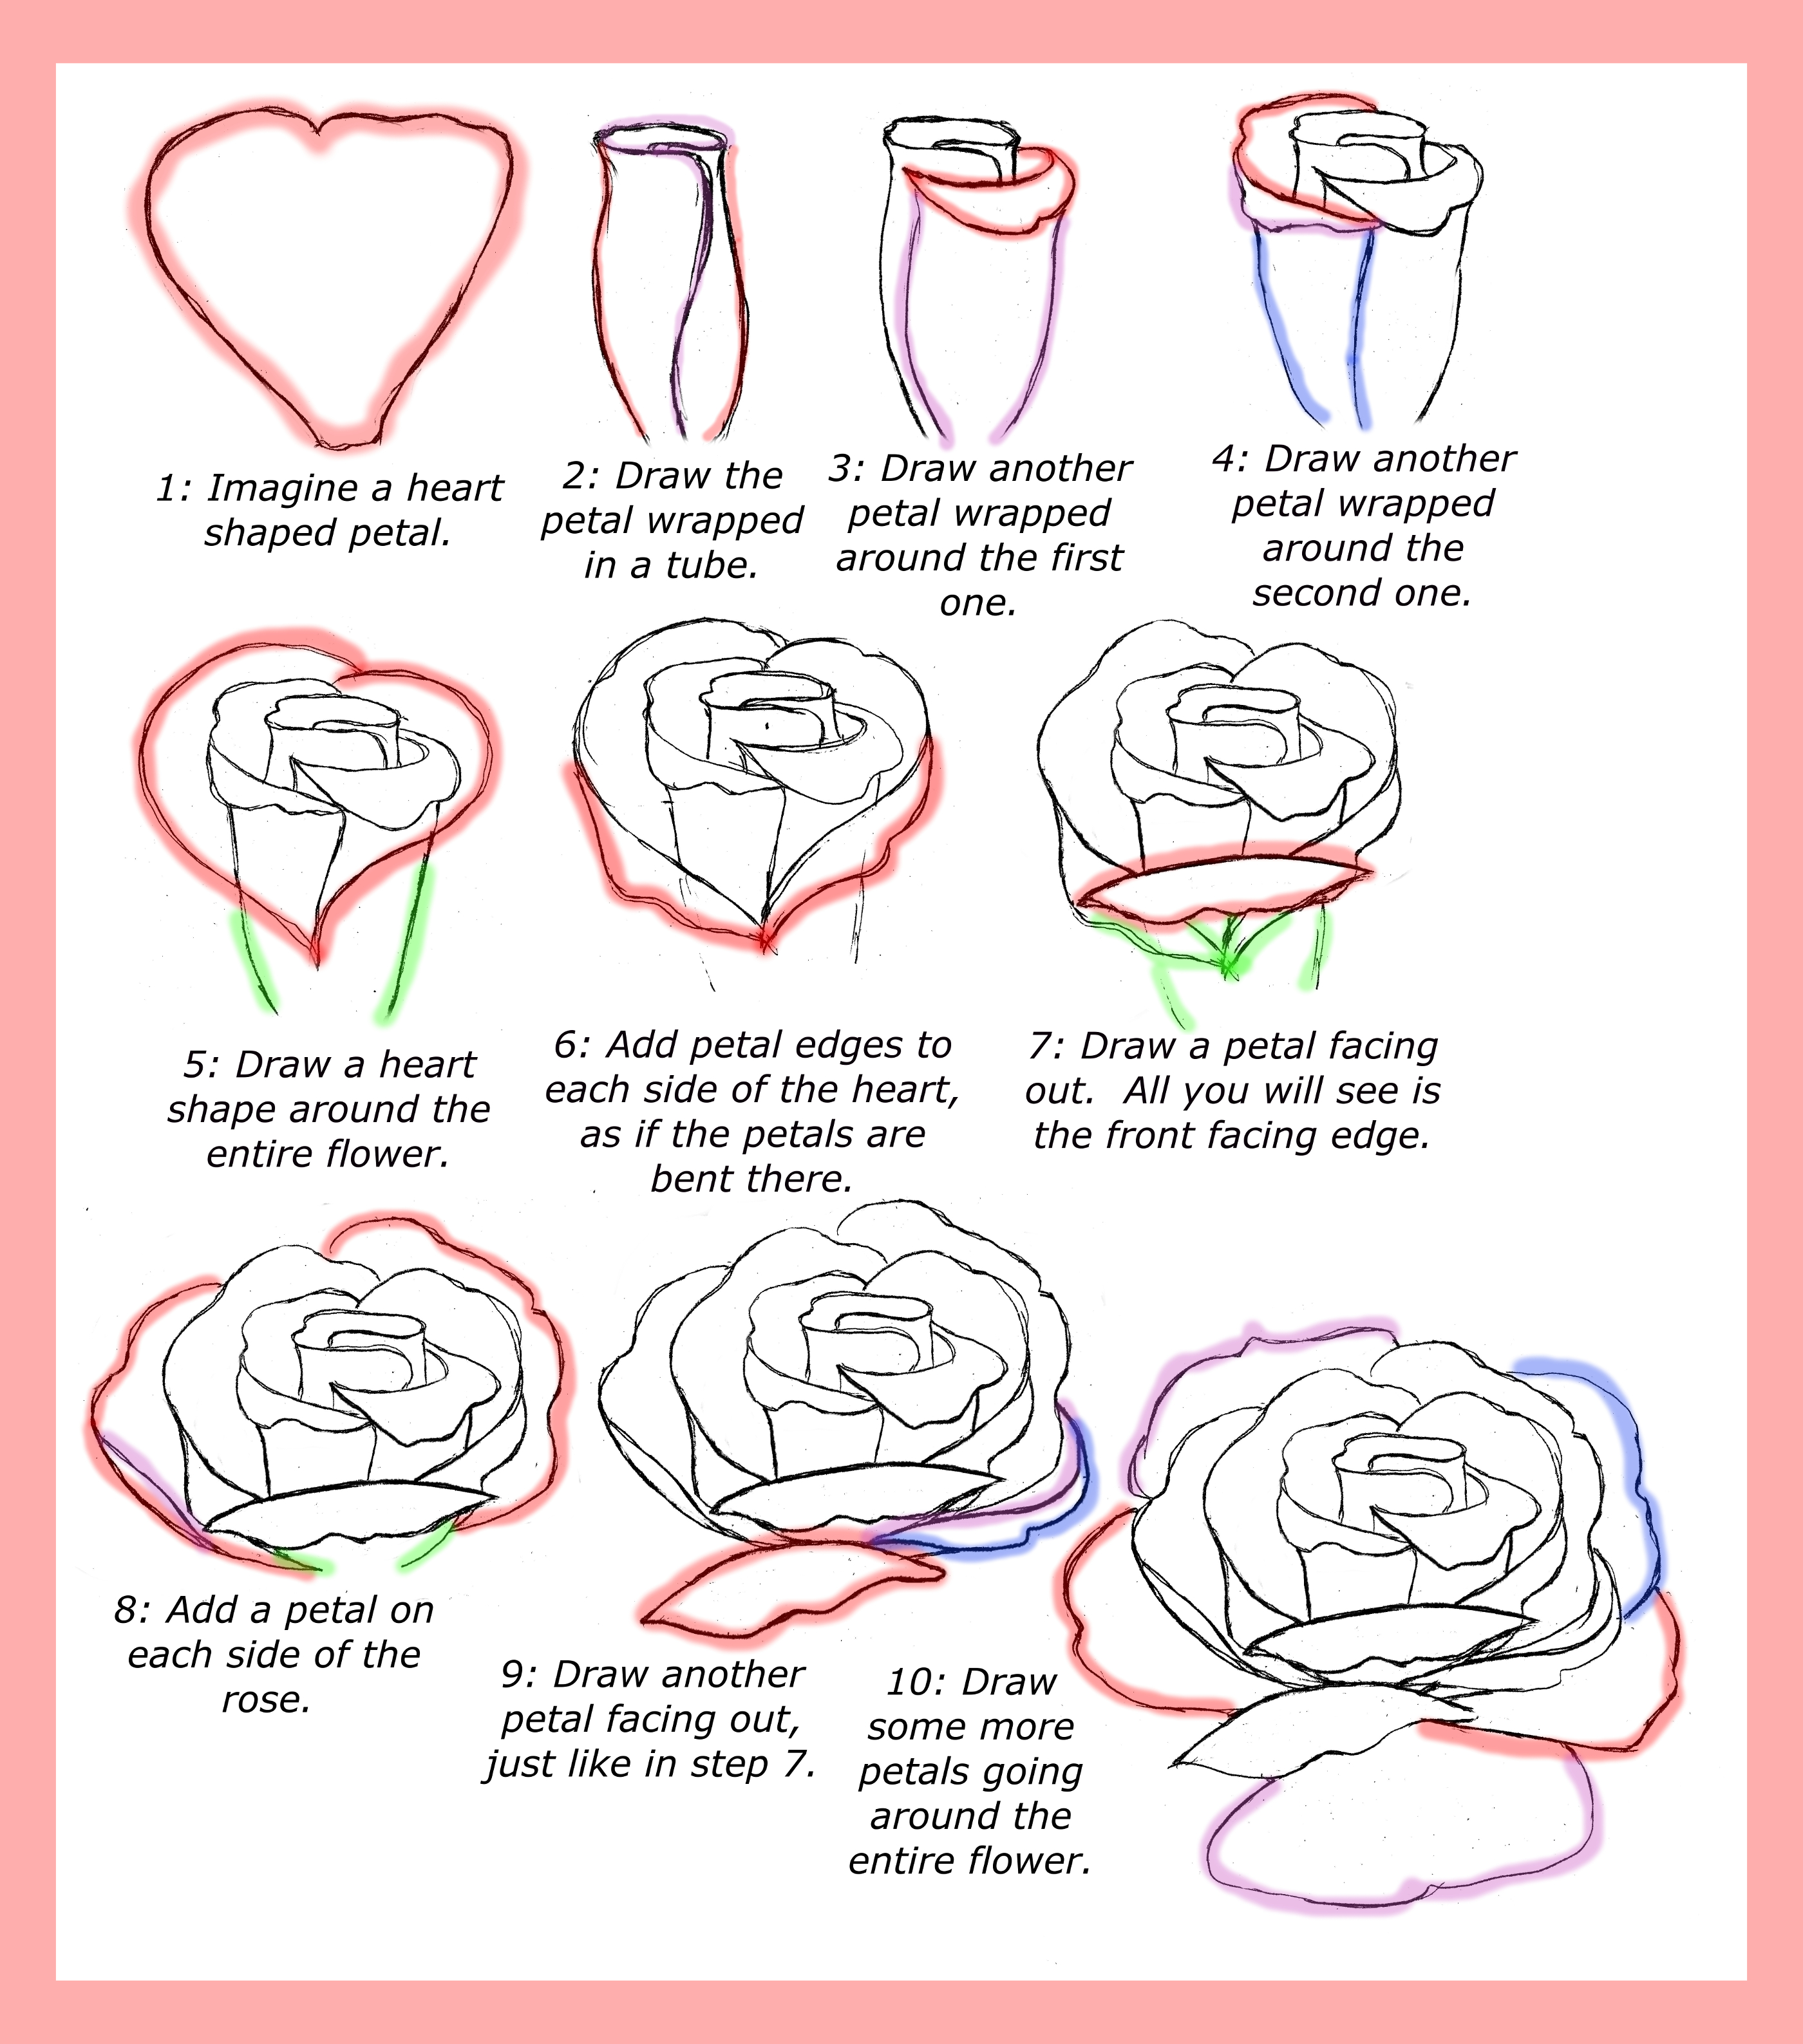
Building the Petals - How to Draw a Rose's Flowing Form
Once you have those basic shapes down, it’s time to start making the petals. You will want to create some uneven, slightly curved shapes around the central oval and the "U" shape. Think of them as soft, wavy lines that curve outwards, almost like little crescent moons that are not quite perfect. These lines will give your rose its natural, flowing appearance, you know, making it look like a real flower with its gentle folds.
After you have those first few petal outlines, you can add just three more lines to help define the inner parts of the rose. These lines will connect some of the earlier shapes, helping to form the distinct sections of the petals. They are very important for giving your rose a sense of depth and making it seem like the petals are curling in on themselves. It's a subtle addition, but it really helps to make the flower look more complete, you know, as if it's truly opening up.
You can then continue to add more of these curved, wavy shapes, building up the layers of petals around the center. Make some of them larger, some smaller, and let them overlap a little bit. This variation is what makes a rose look so natural and full. It’s almost like you’re carefully arranging the petals, one by one, to create a very beautiful and layered appearance. Just keep those lines light and gentle, you know, as you go.
How Can You Make Your Rose Drawing Look Realistic?
Making your rose drawing look like a real flower is a lot about adding some careful details and thinking about how light and shadow play on its surface. It's not just about drawing the lines; it's also about giving the flower a sense of dimension and softness. You can really bring your sketch to life by paying attention to these little things, you know, making it seem almost touchable.
This kind of step-by-step guide often shows you how to add shading to your rose, providing clear examples of how to use your pencil for this. These examples can be very helpful for anyone who wants to learn how to make their drawings look more true to life. By following along, you can see how a few gentle strokes of your pencil can create the impression of depth and make the petals seem to curl and fold in a very natural way.
Capturing the gentle beauty of a rose sketch is a very rewarding feeling. It’s about more than just copying a picture; it’s about understanding how the flower is put together and then translating that onto your paper. With some simple advice, you can make your rose drawing look quite lifelike, almost like you could reach out and touch its soft petals. It's a skill that, you know, grows with a little bit of practice and observation.
Adding Depth - How to Draw a Rose with Shading
To give your rose drawing a sense of depth and make it appear more full, you will want to start thinking about shading. This means using your pencil to create darker and lighter areas on the petals. Imagine where the light would hit the rose and where the shadows would fall, like in the folds of the petals or where one petal overlaps another. This helps to make your drawing look less flat and more three-dimensional, you know, almost like it's popping off the page.
You can achieve this by pressing a little harder with your pencil in the areas that would be in shadow, and using a very light touch for the parts that would catch the light. Blending these different shades gently with your finger or a soft cloth can make the transitions smooth, giving your rose a very soft and realistic look. It's a gradual process, basically, building up the layers of tone to create that wonderful feeling of depth and volume.
When you add these subtle changes in tone, your rose begins to look less like a simple outline and more like a real flower in full bloom. It’s about giving the petals a soft texture and making them appear to curve and overlap in a very natural way. This step is, in some respects, where the magic really happens, turning your basic lines into a truly beautiful and lifelike representation of a rose. It’s a very satisfying part of the drawing process, you know, seeing it come to life.
Why Practice How to Draw a Rose?
Learning how to make a rose drawing is a very useful skill for anyone who enjoys art, whether you consider yourself an artist or just someone who likes to doodle. It gives you a good foundation for drawing other flowers and natural forms, because roses have so many different curves and shapes. It’s a way to build your artistic confidence, you know, one petal at a time.
Drawing flowers is, for many people, a very enjoyable way to spend time. It can be quite calming, almost like a form of quiet reflection. I personally find it a very favorite pastime, and it’s something I always look forward to sharing with others. There’s a certain joy in creating something beautiful with your hands, and a rose, with its classic appeal, is a very rewarding subject to practice. It just feels good, you know, to make something pretty.
Plus, a hand-drawn rose is a very thoughtful and personal gift. As the source text mentions, it’s perfect for special occasions like Valentine's Day, when you want to show someone you care, or for Mother's Day, to give a unique token of affection. It shows you put effort and a bit of your heart into it, which is, in a way, far more meaningful than something bought from a store. It really is a versatile skill to have.
Beyond the Basics - How to Draw a Rose with Character
What we’ve covered so far is just the beginning of your drawing adventures with roses. There are, you know, many different ways to draw a rose, each with its own special look and feel. Once you feel comfortable with these basic steps, you can start to explore other styles and ways to make your roses unique. It’s like learning a basic tune, and then you can start to improvise and add your own flair.
We could, for example, go on to explore several more ways to draw roses, each having its own distinct charm and a very particular style. Some might be more open, some might be tightly budded, and others might have a slightly different petal arrangement. This means your artistic possibilities are quite wide open, and you can keep making new and different kinds of roses, which is pretty exciting, you know, for any artist.
What If My Rose Drawing Doesn't Look Perfect At First?
It’s very common for drawings not to look exactly as you imagined them on your first try, or even your second or third. That’s perfectly normal, and it’s part of the process of learning. The good news is that with each rose you draw, you will find that it gets easier to achieve the look you want. It’s like learning any new skill; consistency and a little bit of patience make all the difference. Just keep at it, you know, and you’ll see improvement.
The main thing is to enjoy the act of creating. Don't worry too much about making it absolutely perfect right away. Focus on understanding the shapes and how they fit together. Each line you put down, each shade you add, helps you learn a little more about how to draw a rose. It’s a very personal journey, and every drawing, even the ones you might not love, teaches you something valuable. So, just have fun with it, you know, and let your hand guide you.
This easy-to-follow guide for drawing a rose is made to help you get the result you want with ease, and it truly does become simpler the more you practice. You’ll find that your hand becomes more steady, your lines become more confident, and your roses will start to bloom beautifully on the paper. It’s a very satisfying progression, seeing your skills grow over time. Just keep sketching, and you’ll see the lovely outcomes, you know, very soon.
This article has covered how to begin drawing a rose, starting with simple shapes like ovals and U-forms, then moving to building petals with crescent shapes and additional lines. We also looked at how to add realism through shading and why practicing this skill can be a rewarding experience for anyone. The piece discussed the minimal supplies needed and offered encouragement for beginners, suggesting that drawing flowers can be a relaxing pastime perfect for creating thoughtful gifts.