Learning to draw a hamster, that is, a truly delightful small creature, can be a rather rewarding pastime for anyone who enjoys putting pencil to paper. This guide lays out a clear path, step by step, for you to follow, helping you bring one of these little furry friends to life on your page. You don't need any special talent to get started, just a willingness to try, and perhaps a bit of paper and some pencils.
This particular instruction set, you know, is put together with younger artists and those just starting out in mind. It aims to make the whole process of creating this animal much, much simpler for you. We're going to break down the form into easily manageable bits, so you can feel good about what you are doing from the very beginning. It's about enjoying the process as much as the finished picture, really.
When you learn how to draw a hamster, you'll find it's a very good way to practice making small and fine details, things like the tiny nose, the little paws, and the bright, watchful eyes. You will also get a better sense of how to draw things that appear real, which is a pretty useful skill to pick up. So, get ready to feel a bit creative and cozy, as we go about drawing one of these very sweet and cuddly small pets.
Table of Contents
- How to Begin Your Drawing of a Hamster?
- Laying Out the Basic Shapes for Your Hamster
- Shaping the Body of a Hamster
- How to Draw a Hamster - Adding the Facial Features?
- Giving Your Hamster Its Paws and Furry Look
- How to Draw a Hamster - Putting on the Finishing Touches?
- What Makes a Picture of a Hamster Appear Lifelike?
- Continuing to Improve Your Drawing Abilities
How to Begin Your Drawing of a Hamster?
Starting to draw a hamster is, in some respects, simpler than you might think. The very first step involves picking up your drawing tools, which usually means a pencil and some paper. You want to feel comfortable with your pencil, holding it in a way that allows for easy, light marks. This initial stage is all about getting ready, preparing your mind and your materials for the creative work ahead. It's a bit like getting your thoughts in order before you start a project, you know?
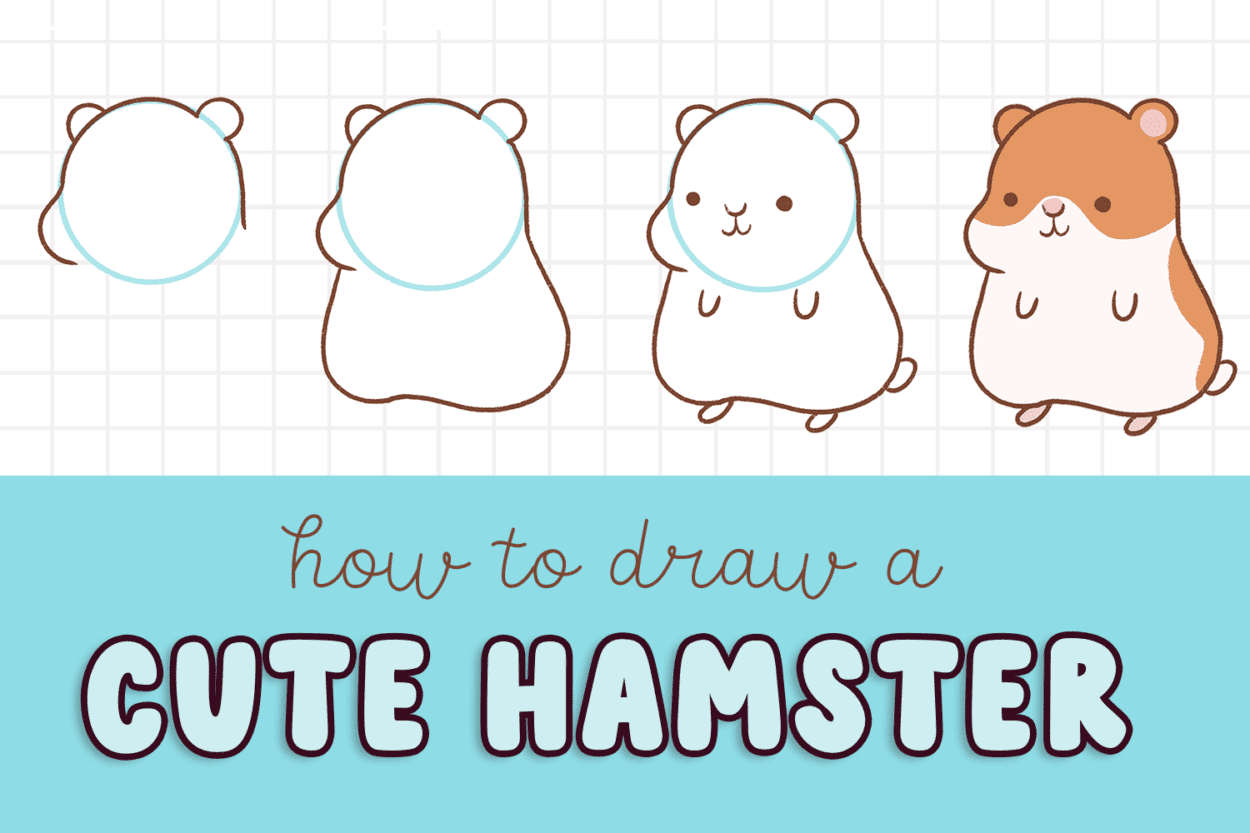
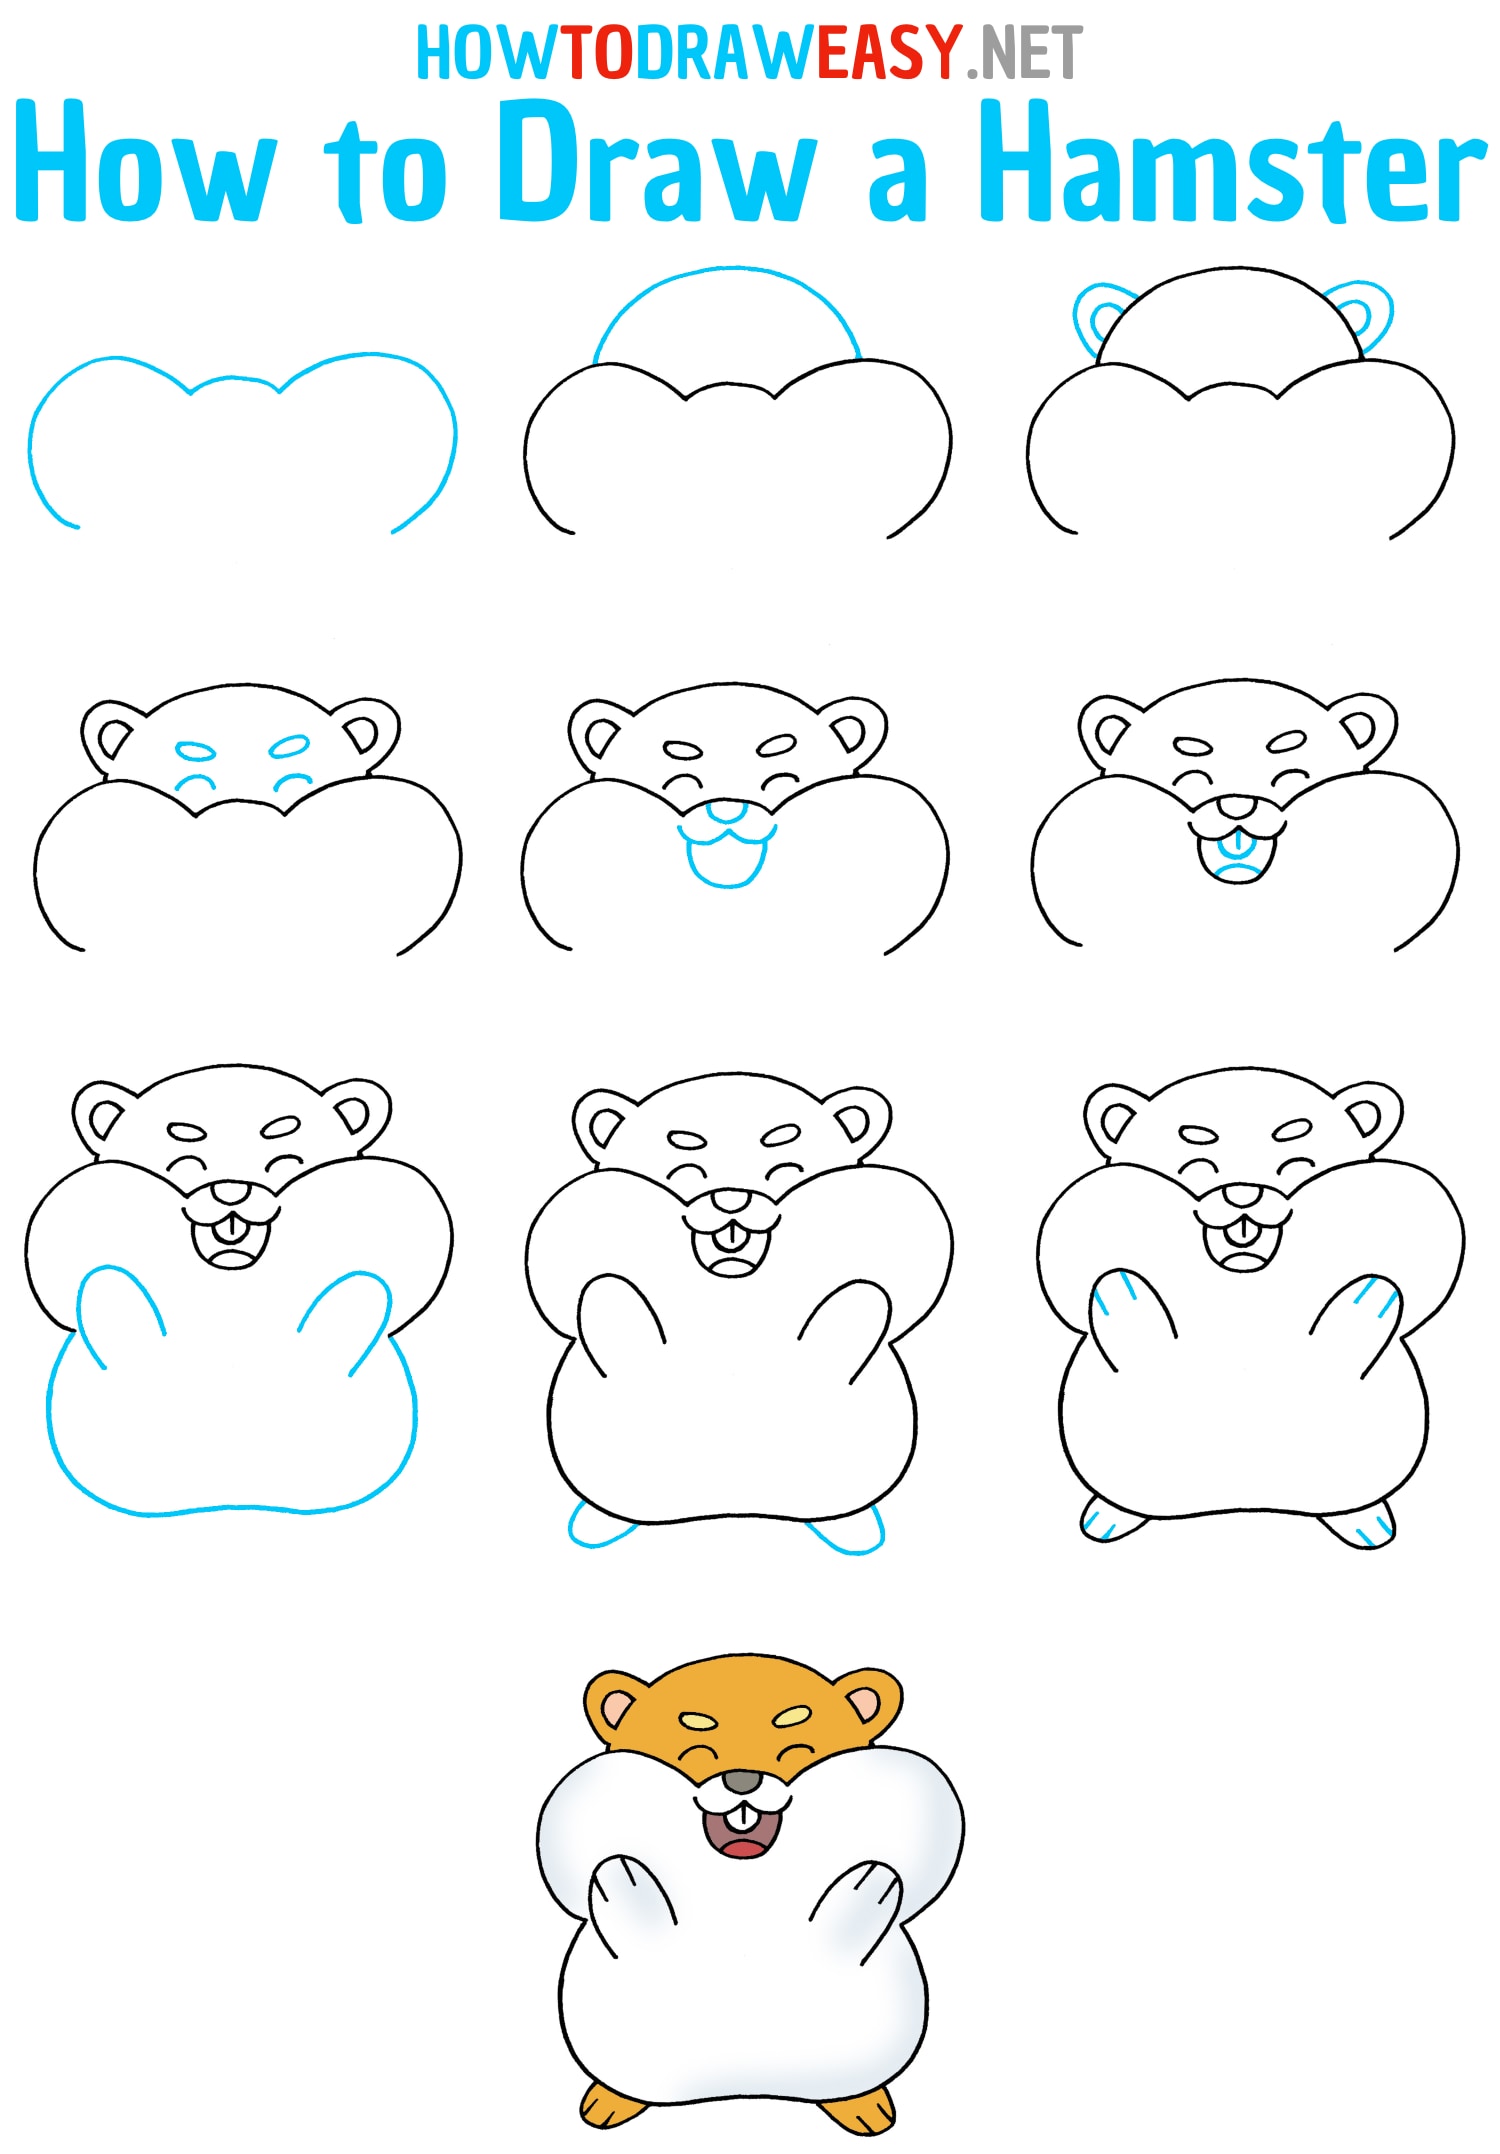
The core idea here is to begin with shapes that are very, very basic. Think about circles and ovals. These simple forms will act as the building blocks for your hamster. You don't need to press hard with your pencil at this point; in fact, light, faint lines are much better. This way, if you need to make changes or erase something, it's pretty easy to do so without leaving big marks. This helps keep your paper looking clean and ready for the next stages, you see.
For the head of your hamster, a nice round circle often works well. For the main part of its body, you might draw a slightly larger oval, or perhaps another circle that connects to the head circle. These shapes don't have to be perfect, not at all. They are just guides, a kind of map for where the different parts of your hamster will eventually sit. It's really about getting the general placement right before you worry about any of the smaller details.
Laying Out the Basic Shapes for Your Hamster
Once you have your first two main shapes, the head and the body, you can then think about how they fit together. You might find that the head circle sits just a little above and slightly overlaps the body oval. This connection is important because it starts to give your hamster a proper shape, rather than just two separate forms. It's like putting two pieces of a puzzle together, more or less, to form a bigger picture.
As you connect these shapes, you can begin to think about the hamster's posture. Is it sitting up, or is it perhaps a bit curled up? The way you position these basic forms will determine the overall feel of your drawing. You're still using light lines, remember, because you're still in the planning phase. This stage is about roughing out the general outline, giving yourself a framework to work within, which is actually quite helpful.
Some people find it useful to draw a line down the middle of the head circle and another across it, like a cross. These lines can help you later on when you place the eyes and nose, ensuring they are more or less even. It's a simple trick, but it can make a good difference in how balanced your hamster's face appears. So, these initial steps are all about setting up a solid foundation for your drawing, you know, making sure everything has a place.
Shaping the Body of a Hamster
With the basic circles and ovals in place, it's time to smooth out the lines and start to form the actual shape of your hamster's body. You can begin to draw curved lines that connect the head to the body, making the neck area. Hamsters tend to have a very short neck, so these curves will be gentle and close to the head shape. You're basically softening the edges of your initial circles and ovals, giving them a more natural flow, that is.
Think about the hamster's back and belly. The back will usually have a gentle curve, going from the top of the head down towards where the tail might be, even though hamster tails are very, very small. The belly will also have a curve, often a bit rounder, suggesting the hamster's cute, chubby appearance. This is where you start to see your drawing really take on the form of a hamster, rather than just a collection of shapes, you see.
You can also start to lightly sketch in where the legs and feet might go. These are still just rough guides, small shapes or lines that indicate position. Hamsters have relatively short legs, so you won't need to draw long, extended limbs. It's more about suggesting their presence at this stage. By taking your time with these initial body shapes, you're building a solid base for all the details that will come next, which is pretty important.
How to Draw a Hamster - Adding the Facial Features?
Now that the main body shape is more or less set, we can move on to the face, which is often where the hamster's personality truly shows. The eyes are a good place to start. Hamsters have relatively large, dark eyes that are set on the sides of their heads. You can draw them as small, round circles within the head shape you've already made. Make sure they are somewhat even, using those guide lines if you drew them, so they look balanced.
For the nose, it's typically a tiny, triangular or heart-shaped form right at the front of the face, below the eyes. It's very small, so a little dot or a small, simple shape will do. Below the nose, you can draw a small line for the mouth, perhaps curving it slightly upwards to give your hamster a sweet, happy expression. These small details, you know, really start to make your drawing come alive.
The ears are also important for the face. Hamster ears are usually small and round, sitting on top of the head, a little to the sides. You can draw them as simple curved shapes, almost like small cups. Think about how they might stick up a bit from the head. These features, when put together, create that very recognizable hamster face. It's about placing each part carefully, building up the picture bit by bit.
Giving Your Hamster Its Paws and Furry Look
With the face taking shape, it's time to give your hamster its paws. Hamster paws are quite small and have tiny little fingers, almost like miniature hands. For the front paws, you can draw small, rounded shapes at the bottom of the body, just where the chest would be. You can then add a few small lines to suggest the individual digits. These details, though small, really add to the overall impression of the hamster, you see.
The back paws are often a bit larger and more rounded, sitting underneath the body towards the rear. Again, you can add some small lines to show the toes. Remember, hamsters are often depicted in a sitting position, so their paws might be tucked in close to their bodies. It's about suggesting their form rather than drawing every single line perfectly, which is kind of liberating, actually.
Now, to give your hamster that soft, furry appearance, you can use short, light strokes with your pencil. Instead of drawing a single, solid outline, you can make many tiny, overlapping lines along the edges of your hamster's body. This creates a textured look, making it seem like it has soft fur. You can also add some of these short strokes within the body to suggest the fur's direction and volume. This technique, you know, really brings out the cuddly aspect of the animal.
How to Draw a Hamster - Putting on the Finishing Touches?
Once you have the main features and fur texture, there are a few more details that can really make your hamster drawing pop. Whiskers are a must for a hamster. You can draw several thin, curved lines extending from the sides of its nose area. These lines should be delicate and can vary in length, giving a very natural look. They add a lot to the hamster's character, really.
You can also think about adding a tiny, tiny tail. Hamster tails are famously short, almost just a small bump at the very back of their body. It's often just a small, rounded shape that barely sticks out. Don't make it too long, or it might look like a different animal entirely! This small detail, though easily missed, helps to complete the overall shape of the creature, more or less.
If your hamster is meant to be eating, as some of the inspiration suggested, you could draw a small peanut or a seed in its paws. This adds a story to your drawing and gives the hamster something to interact with. It also provides another opportunity to practice drawing small, specific shapes. These finishing touches, you know, are what give your drawing its unique charm and appeal.
What Makes a Picture of a Hamster Appear Lifelike?
To make your drawing of a hamster appear more real, you can pay attention to things like light and shadow. Even with simple pencil drawing, you can add shading to give your hamster a sense of depth and roundness. Think about where the light might be coming from. Areas that are closer to the light source would be brighter, while areas that are further away or tucked underneath would be a bit darker. This is pretty important for making things look three-dimensional.
You can use different pressures with your pencil to create lighter or darker shades. A very light touch will make a faint mark, while pressing a little harder will create a darker tone. You can also layer your pencil strokes, building up the darkness gradually. This helps to create smooth transitions between light and shadow, which is actually a fundamental part of drawing things that appear real, you know.
Also, consider the proportions. While we started with basic shapes, as you refine your drawing, make sure the head isn't too big for the body, or the paws too large. Keeping the different parts of the hamster in a balanced relationship to each other helps it look more like the actual animal. It's about observing and adjusting, making sure everything fits together in a way that feels natural. This careful observation, you see, is what gives your drawing a more believable quality.
Continuing to Improve Your Drawing Abilities
Learning how to draw a hamster is, in some respects, just one step on a bigger path of learning to draw all sorts of things. The skills you pick up here, like making small details or understanding basic shapes, are very, very useful for many other drawing projects. The more you practice, the more comfortable you will become with your drawing tools and the more confident you will feel in your abilities. It's a bit like learning to ride a bike; the more you do it, the easier it gets, more or less.
Don't be afraid to try drawing your hamster again, perhaps from a different angle or in a different pose. Each time you draw, you will notice new things and find new ways to make your picture better. Maybe you'll focus on making the fur look even softer, or the eyes seem even brighter. It's all part of the process of getting better at drawing, you know, finding little improvements each time.
You can also look at pictures of real hamsters to get ideas for how they look and behave. Observing actual animals can give you a lot of inspiration for your drawings. This kind of observation helps you understand the true form of the creature, which is pretty helpful for making your drawings appear more genuine. So, keep drawing, keep looking at the world around you, and enjoy the creative process. That's the main thing, really.
This guide has walked you through the steps of drawing a hamster, from starting with simple shapes to adding fine details like whiskers and fur. We covered how to lay out the basic form, shape the body, add the important facial features, draw the paws, and put on the finishing touches. We also discussed how paying attention to light, shadow, and proportions can make your drawing appear more lifelike. The article also touched on how these drawing skills can help you improve generally.