So, you've found yourself with a little opening in your wall, maybe from a picture hook that went rogue or perhaps a doorknob that got a bit too enthusiastic. It happens, you know, to pretty much everyone at some point. That small, sometimes a little annoying, break in the smooth surface of your wall might seem like a big deal at first glance, but honestly, it's something you can totally handle with just a few straightforward steps and some basic items. We're going to walk through how to patch a hole in drywall, making it look as good as new, without too much fuss or complicated jargon.
You might be wondering if this kind of repair is something you can actually do on your own, and the answer is a resounding yes. It's not nearly as tough as it might seem from the outside, and with a bit of patience, you can get your wall back to its original, unbroken state. This guide is here to give you the simple, step-by-step pointers you need to get the job done, helping you feel pretty confident about tackling that wall repair yourself, which is kind of nice.
We'll go over everything from preparing the spot to making sure your repair blends in seamlessly with the rest of your wall. You'll learn about the different ways to approach the repair, depending on the size of the opening, and some clever little tricks to make the whole process smoother. It's really about giving you the practical know-how to fix up those wall imperfections, making your living space feel complete again, more or less, which is what we're aiming for.
Table of Contents
- Getting Ready to Patch a Hole in Drywall
- What's the Best Way to Cut the Drywall for a Patch?
- Making Your Patch Fit Just Right
- How Do You Prepare the Edges When You Patch a Hole in Drywall?
- Applying the Compound and Finishing Up
- Should You Use Tape When You Patch a Hole in Drywall?
- How Many Coats of Compound Should You Use to Patch a Hole in Drywall?
- The Final Touches for Your Drywall Repair
Getting Ready to Patch a Hole in Drywall
Before you even think about putting anything new on your wall, you really need to get the area ready. This means looking at the opening and deciding how you're going to clean it up. Sometimes, you'll have jagged edges or bits of paper sticking out, and those just won't do for a good, solid repair. You want a surface that's as smooth and neat as possible, which, you know, makes everything else easier.
One of the first things you might consider is making the existing opening a bit more regular in shape. If it's a small, irregular tear, you could use a tool to square it off. A utility knife, or perhaps a keyhole saw, can help you get a nice, straight-edged opening. This helps a lot when you're trying to fit a new piece of material into the space. Basically, you're creating a proper foundation for your patch, which is pretty important.
You might find that you have some extra bits of drywall lying around from a previous project, and that's actually pretty handy. If you do, you can totally make your own patch piece. This is often easier than trying to buy a pre-made one, especially if your opening is a bit unusual in size. Just make sure whatever material you're using for the patch is in good shape, no bends or breaks, as a matter of fact.
What's the Best Way to Cut the Drywall for a Patch?
When it comes to getting that opening just right, you've got a couple of options for tools. You could use a very sharp razor blade, the kind that's often found in a utility knife, or a saw specifically designed for cutting drywall. Both of these can help you create a clean opening, which is what you're really going for here. The choice often depends on the size of the damaged spot, too.
A drywall saw, for instance, is pretty good for getting rid of a good amount of the damaged material quickly. It's built to cut through the plasterboard with relative ease, so if you've got a larger section to remove, that's often the tool you'd reach for. It just makes the initial clearing out of the space a bit more straightforward, you know.
On the other hand, a razor blade, especially a fresh one, is excellent for making really precise, clean cuts. This is super helpful for getting those edges nice and crisp, which is kind of what you want for a seamless repair. After you've cut out the main damaged part, you can then use this new, clean opening as a sort of guide or pattern for your patch piece. This helps ensure everything lines up properly, which is pretty essential.
Making Your Patch Fit Just Right
Once you have a clean opening in your wall, the next big step is getting your patch piece to fit perfectly. This is where a little bit of careful work really pays off. The goal is to make the replacement piece match the opening as closely as possible, which, you know, just makes the whole repair look much better in the end. A snug fit means less work later on with filling and sanding, which is always a good thing.
If you're making your own patch, you'll want to cut a piece of drywall that's just a tiny bit bigger than the opening you've created. Then, you can place this slightly larger piece over the opening on your wall and trace around it. This tracing will mark exactly what you need to cut out on your wall to make room for your patch. It's a way of ensuring a custom fit, almost, which is pretty neat.
After you've traced the outline, you'll use your cutting tool – either that sharp razor blade or the drywall saw – to cut along the line you've just drawn. The more accurately you cut, the better your patch will fit. You're aiming for a clean, precise opening that's ready to accept your new piece of drywall. This step, frankly, sets the stage for the rest of your repair, so take your time with it.
Sometimes, you might find that the new opening you've created is really close to where the old damage was, or perhaps it even overlaps a bit, especially if you're not super confident with your cutting skills. In such cases, you have a couple of choices. You could simply cut out a larger area to encompass both the old and new damage, and then make a larger patch to fit that bigger space. This is often the simplest approach for combining nearby damage, as a matter of fact.
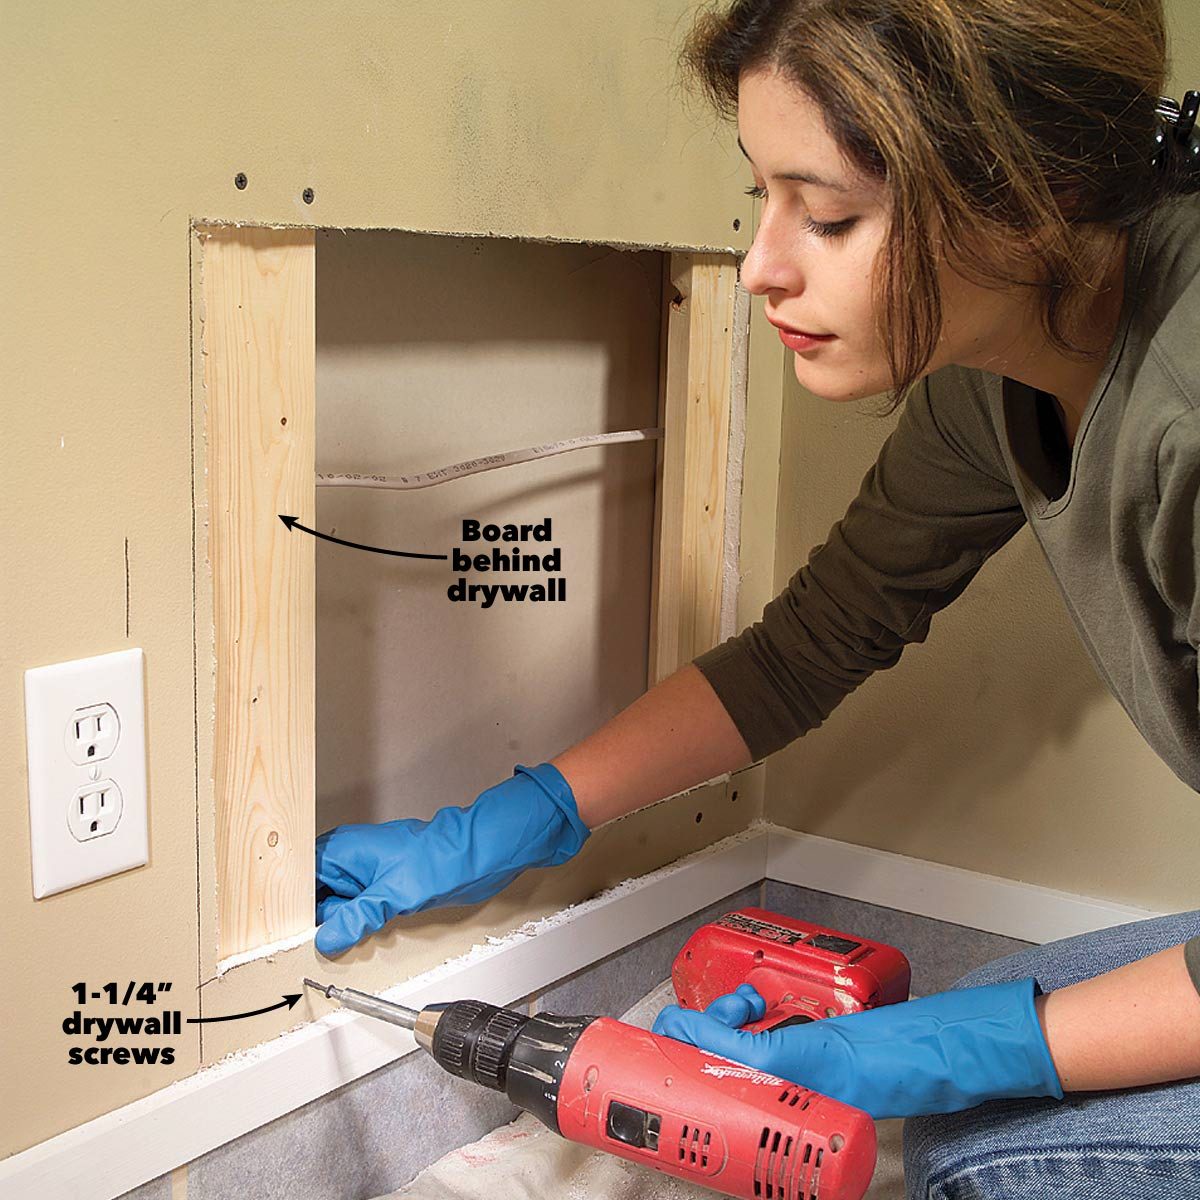
Alternatively, if you prefer to keep the patch smaller, you could add some wood strips behind the existing wall opening. These strips would act as something to screw your small patch into, giving it a solid anchor. Then, you'd fit your small patch into the opening and fill the gaps around it. You'd typically force joint compound into these gaps using a small drywall tool to make sure it's all sealed up tight. It's a bit more involved, perhaps, but totally doable.
How Do You Prepare the Edges When You Patch a Hole in Drywall?
Once you've got your patch cut and ready, and your wall opening is shaped, you need to pay attention to the edges of both. It's really important to make sure these edges are smooth. You don't want any small pieces of facing paper, or any little fuzzies, sticking out. These tiny bits can cause problems later on when you're trying to get a smooth finish with your compound, you know.
As others have pointed out, shaving off those paper fuzzies is a pretty good idea. You can usually do this by angling your utility knife just slightly. The aim is to create a very, very slight V-shaped groove around the edge of the opening. This little groove helps the joint compound get a better grip and creates a smoother transition from the patch to the existing wall. It's a small detail, but it makes a noticeable difference, as a matter of fact.
This attention to detail on the edges applies to your patch piece as well. Before you put it in, run your hand along its edges and make sure there are no loose bits of paper or rough spots. A clean, smooth edge on your patch will help it sit flush with the existing wall and make the whole blending process much simpler later on. It's about getting everything as neat as possible from the start, which is pretty helpful.
Applying the Compound and Finishing Up
With your patch in place and the edges looking good, it's time to start thinking about the compound, the stuff that fills in the gaps and creates that smooth surface. For many repairs, especially those that need to dry quickly, some people just fill the space with what's called a setting compound, sometimes known as "hot mud." This type of compound sets up pretty fast, which can be a real time-saver, you know.
When using a setting compound, it's often paired with a squared-in mesh material. This mesh provides some reinforcement for the patch, helping to prevent cracks from forming later on. You'd typically apply the compound over the mesh, making sure it's fully embedded and creating a flat surface. It's a pretty straightforward way to get a solid fill, actually.
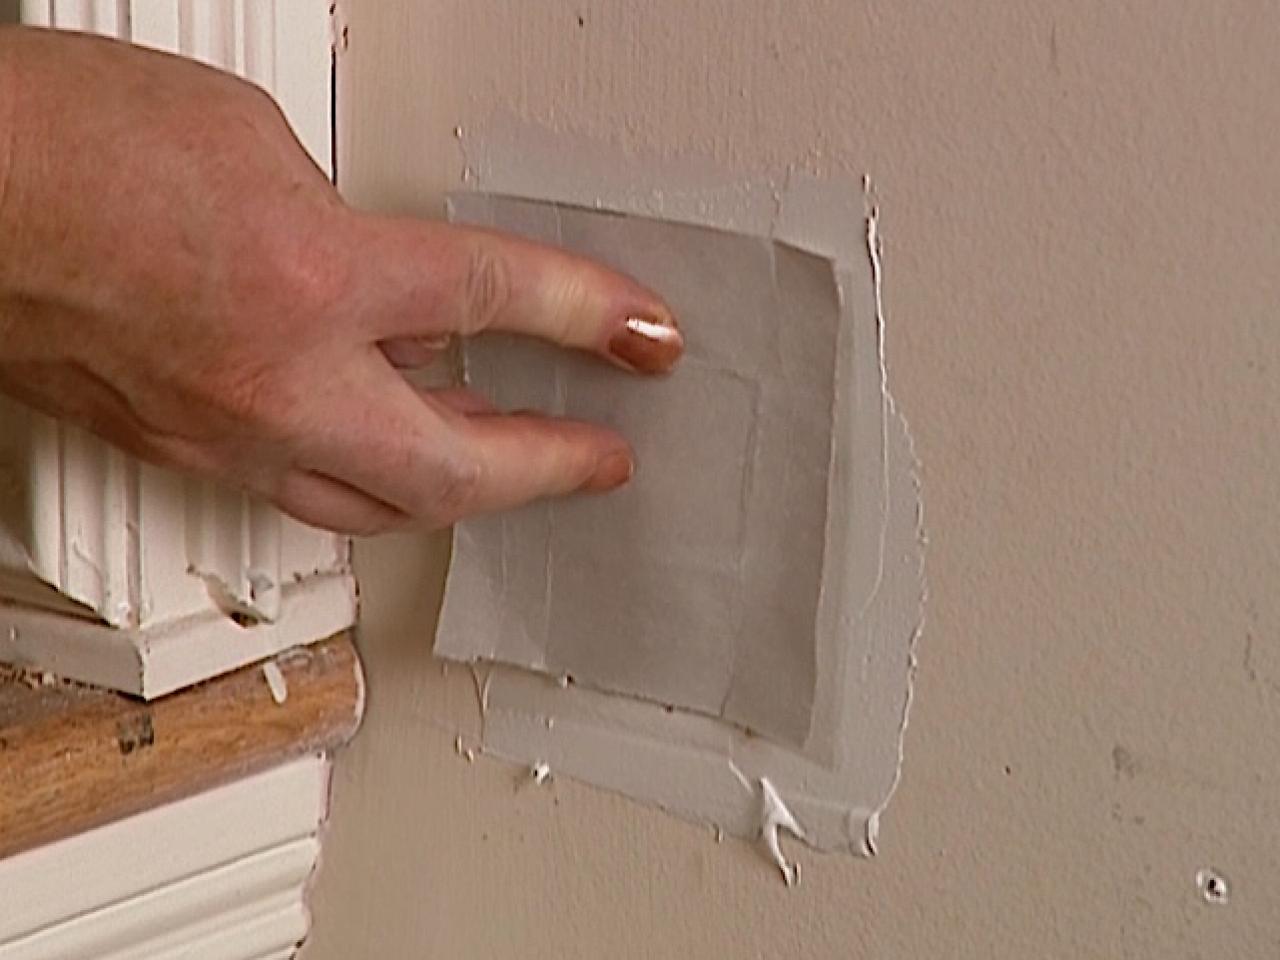
For a hole of a certain size, say, anything that's not just a tiny nail hole, using tape is generally a good idea to prevent cracking down the line. The joint tape goes over the opening, not actually into it. You'd first skim a layer of compound into the opening to fill it, then lay the tape over that, making sure the tape extends onto the undamaged drywall around the opening. This overlapping helps create a strong bond and a more durable repair, which is quite important.
You then let that first layer of compound and tape dry completely. A deeper patch might take a little longer to dry, so patience is key here. Don't try to rush this part, or you might end up with issues later on. Giving it enough time to firm up properly is, like, super important for a good outcome.
Should You Use Tape When You Patch a Hole in Drywall?
The question of whether to use tape when you patch a hole in drywall comes up pretty often. For anything more than a very small, almost pin-sized hole, the general consensus is that tape is a good idea to help prevent future cracks. It provides a layer of reinforcement that simply makes the repair stronger and more likely to last. It's sort of like adding a little extra insurance for your wall, if you think about it.
You don't always need to use traditional joint tape, though. There's another method that actually uses the paper facing from the patch piece of drywall itself. This technique involves cutting the patch in a specific way so that the paper around the edges of the patch extends beyond the plaster core. This extended paper then serves a similar purpose to joint tape, providing a surface for the compound to bond to and helping to blend the patch into the wall. It's a clever trick, actually, for how to patch a hole in drywall.
Regardless of whether you use separate tape or the paper from the patch, the idea is the same: you want to reinforce the seam where the new patch meets the old wall. This reinforcement is what keeps the repair from showing stress cracks over time, especially with the normal shifting and settling that happens in any home. So, yes, for most holes, some form of reinforcement is pretty much a good call, as a matter of fact.
How Many Coats of Compound Should You Use to Patch a Hole in Drywall?
When you're applying the joint compound, whether it's setting compound or a regular all-purpose type, the key is to apply several thin coats rather than one thick one. This is a pretty common piece of advice in drywall repair, and for good reason. Trying to get it all done in one go usually leads to problems like cracking, shrinkage, or a surface that's really hard to make smooth, which is not what you want.
In both cases, meaning whether you're using tape or not, applying several thin coats can really make the whole repair process much easier, especially when it comes to sanding and getting it ready for paint. Each thin layer dries more evenly and is less likely to crack. You'll apply one layer, let it dry completely, then lightly sand it before applying the next. This layering builds up the surface gradually and smoothly, you know.
Don't try to get the whole thing finished in just one day either. Drywall compound needs time to dry properly between coats, and rushing it can mess up all your hard work. In some situations, even a small patch might need a day or two of drying time between coats to ensure everything is completely set and ready for the next step. Patience here really pays off in the long run, actually.
The Final Touches for Your Drywall Repair
After you've applied all your thin coats of compound and each layer has had plenty of time to dry, you're almost there. The final stage is all about making that repair disappear. This means sanding the area until it's completely smooth and blends in perfectly with the surrounding wall. You want to feel no bumps or ridges when you run your hand over it. This smooth finish is what makes your hard work truly shine, which is pretty satisfying.
Once you're happy with the smoothness, you'll want to prime the patched area. Priming helps seal the compound and creates a uniform surface for your paint. It prevents the new patch from "flashing" or absorbing paint differently than the rest of the wall, which can sometimes happen. A good coat of primer ensures that your new paint color will look consistent across the entire wall, which is, like, really important for a professional look.
Finally, it's time to paint. Apply your chosen wall color, making sure to blend it seamlessly with the existing paint. You might need a couple of coats of paint to get full coverage and a uniform appearance. Step back and admire your work – that annoying opening will be gone, replaced by a smooth, unbroken wall surface. You've successfully managed how to patch a hole in drywall, making it look as though nothing was ever wrong there, which is pretty cool, if you ask me.
:max_bytes(150000):strip_icc()/repair-a-large-hole-in-drywall-1824831_03_install_patch_1545-68477076e16b4775b65d51fe92b17122.jpg)